Bar: Difference between revisions
imported>Bandit m (→Theatre: typos and shit) |
No edit summary |
||
| (28 intermediate revisions by 8 users not shown) | |||
| Line 1: | Line 1: | ||
<font size="4">'''[[ | <font size="4">'''[[Guide_to_Drinks|For the Guide to Drinks, click here.]]'''<br> | ||
'''[[Bartender|For the Guide to the Bartender, click here.]]'''</font> | |||
<tabs> | |||
<tab style="width:100%" name="BoxStation"> | |||
{{Location | {{Location | ||
|headerbgcolor=#92b26d | |||
|headerbgcolor= | |||
|headerfontcolor = black | |headerfontcolor = black | ||
| | |image=Bar_box.png | ||
|location=Bar | |||
|description=Relax and have a drink or two. | |||
|purpose=Host barfights and get drunk. | |||
|items=A [[Piano|piano]], Booze-O-Mat. | |||
|workers=[[Bartender]] | |||
|access=[[Bartender]] for the bar | |||
|exits=South to Starboard Primary Hallway, north to the [[Dormitory]], north-east to [[maintenance]], east to [[Kitchen]] | |||
|department=Recreational | |department=Recreational | ||
| | |footerbgcolor=#92b26d | ||
| | |footerfontcolor = black | ||
}} | }} | ||
Welcome to the Maltese Falcon Bar & Grill! | Welcome to the Maltese Falcon Bar & Grill! | ||
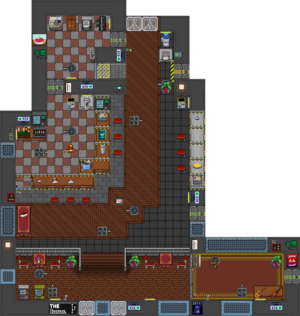
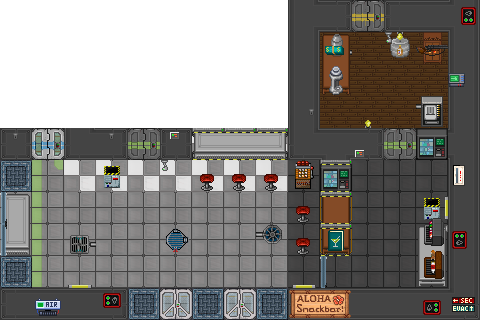
The bar is located on the eastern side (starboard corridor) of the station, and is adjacent to the [[Kitchen]]. It is the spawn point and workplace of Pun Pun the Monkey (rip deempisi) and the [[Bartender]]. Be careful, as [[Medical Doctor]]s come here to steal every last drop of the Bar's booze. They will stay there until all of the Pan Galactic Gargle Blasters are completely chugged away. | |||
The bar is located on the eastern side (starboard corridor) of the station, and is adjacent to the Kitchen. It is the spawn point and workplace of Pun Pun the Monkey (rip deempisi) and the [[Bartender]]. | |||
By default the bar's sign will be chosen randomly, but the bartender can choose whichever one he wants to be displayed by interacting with the sign. | |||
[[ | <div class="toccolours mw-collapsible mw-collapsed" style="width:800px"> | ||
'''Bar Signs | |||
<div class="mw-collapsible-content"> | |||
[[File:Alohasnackbar.gif]] '''Aloha Snackbar!'''<br> | |||
[[File:Combocafe.gif]] '''Combo Cafe'''<br> | |||
[[File:Emergencyrumparty.gif]] '''Emergency Rum Party!'''<br> | |||
[[File:Honkednloaded.gif]] '''Honked 'n Loaded'''<br> | |||
[[File:Maidcafe.gif]] '''Maid Cafe'''<br> | |||
[[File:Maltesefalcon.gif]] '''Maltese Falcon'''<br> | |||
[[File:Officerbeersky.gif]] '''Officer Beersky'''<br> | |||
[[File:Oldcockinn.gif]] '''Old Cock Inn'''<br> | |||
[[File:Robustacafe.gif]] '''Robusta Cafe'''<br> | |||
[[File:Scotchservinwillys.gif]] '''Scotch Servin' Willys'''<br> | |||
[[File:Slipperyshots.gif]] '''Slippery Shots'''<br> | |||
[[File:Theadminbus.gif]] '''The Adminbus'''<br> | |||
[[File:Thealenath.gif]] '''The Ale Nath'''<br> | |||
[[File:Thebark.gif]] '''The Bark'''<br> | |||
[[File:Thecavern.gif]] '''The Cavern'''<br> | |||
[[File:Thecoderbus.gif]] '''The Coderbus'''<br> | |||
[[File:Thedrunkcarp.gif]] '''The Drunk Carp'''<br> | |||
[[File:Thegoose.gif]] '''The Goose'''<br> | |||
[[File:Thegreytide.gif]] '''The Greytide'''<br> | |||
[[File:Theharmbaton.gif]] '''The Harmbaton'''<br> | |||
[[File:Thelightbulb.gif]] '''The Lightbulb'''<br> | |||
[[File:Thenest.gif]] '''The Nest'''<br> | |||
[[File:Thenet.gif]] '''The Net'''<br> | |||
[[File:Theouterspess.gif]] '''The Outer Spess'''<br> | |||
[[File:Theshaken.gif]] '''The Shaken'''<br> | |||
[[File:Thesingulo.gif]] '''The Singulo'''<br> | |||
[[File:Thesyndicat.gif]] '''The SyndiCat'''<br> | |||
[[File:Thewretchedhive.gif]] '''The Wretched Hive'''<br> | |||
[[File:Vladssaladbar.gif]] '''Vlad's Salad Bar'''<br> | |||
[[File:Little_treats.gif]] '''Little Treats Tea Room'''<br> | |||
[[File:Le_cafe_silencieux.gif]] '''Le Café Silencieux'''<br> | |||
[[File:Maltroach.gif]] '''Maltroach'''<br> | |||
[[File:Rock-bottom.gif]] '''Rock Bottom'''<br> | |||
[[File:The-assembly-line.gif]] '''The Assembly Line'''<br> | |||
[[File:Bargonia.gif]] '''Bargonia'''<br> | |||
[[File:Cult-cove.gif]] '''Cult Cove'''<br> | |||
[[File:Neon-flamingo.gif]] '''Neon Flamingo'''<br> | |||
[[File:Slowdive.gif]] '''Slowdive''' | |||
Special circumstances will result in one of the following bar signs:<br> | |||
[[File: | [[File:Emptybarsign.png]] <br> | ||
[[File:Empbarsign.gif]] | |||
</div> | |||
</div> | |||
The | The bar features seating areas, a theater, a bar and a private room for the bartender. | ||
The theater is located in the south-east area of the bar and gives host to the famous Honk Bot. There is also a variety of instruments for all your performance needs, including a piano. You will find plenty of space to decorate the stage. This is your chance to make your face well-known across the station! | |||
[[ | The bar, located to the west, contains enough seating for plenty of visitors. You will be greeted by Pun Pun on your arrival, and the bartender if he's not already drunk off the booze. You will need Bar access <s>or just climb over the tables</s> to enter into the main section of the bar. This contains a Booze-O-Mat and all the tools the [[Bartender]] needs to mix and serve drinks. | ||
The private room is located just north of the bar, and requires Bar access to enter. This is where [[Cult|suspicious]] [[Changeling|activities]] take place. As well as that there are two lockers and a clothing vendor. | |||
</tab> | |||
<tab style="width:100%" name="DeltaStation"> | |||
{{Location | |||
|headerbgcolor=#92b26d | |||
|headerfontcolor = black | |||
|image=Bar_delta.png | |||
|location=Bar | |||
|description=Relax and have a drink or two. | |||
|purpose=Host barfights and get drunk. | |||
|items=Musical instruments, Booze-O-Mat, tables, a wide assortment of alcoholic drinks | |||
|workers=[[Bartender]] | |||
|access=[[Bartender]] for the bar | |||
|exits=East to Fore Primary Hallway, south to the kitchen, west to the Service Hallway | |||
|department=Recreational | |||
|footerbgcolor=#92b26d | |||
|footerfontcolor = black | |||
}} | |||
Welcome to the Maltese Falcon Bar & Grill! | |||
The bar is located to the north of the station, and is adjacent to the Kitchen. It is the spawn point and workplace of the [[Bartender]]. The bar door and back room all require Bar access. Be careful, as [[Medical Doctor]]s come here to steal every last drop of the Bar's booze. They will stay there until all of the Pan Galactic Gargle Blasters are completely chugged away. | |||
By default the bar's sign will be chosen randomly, but the bartender can choose whichever one he wants to be displayed by interacting with the sign. | |||
<div class="toccolours mw-collapsible mw-collapsed" style="width:800px"> | |||
'''Bar Signs | |||
<div class="mw-collapsible-content"> | |||
[[File:Alohasnackbar.gif]] '''Aloha Snackbar!'''<br> | |||
[[File:Combocafe.gif]] '''Combo Cafe'''<br> | |||
[[File:Emergencyrumparty.gif]] '''Emergency Rum Party!'''<br> | |||
[[File:Honkednloaded.gif]] '''Honked 'n Loaded'''<br> | |||
[[File:Maidcafe.gif]] '''Maid Cafe'''<br> | |||
[[File:Maltesefalcon.gif]] '''Maltese Falcon'''<br> | |||
[[File:Officerbeersky.gif]] '''Officer Beersky'''<br> | |||
[[File:Oldcockinn.gif]] '''Old Cock Inn'''<br> | |||
[[File:Robustacafe.gif]] '''Robusta Cafe'''<br> | |||
[[File:Scotchservinwillys.gif]] '''Scotch Servin' Willys'''<br> | |||
[[File:Slipperyshots.gif]] '''Slippery Shots'''<br> | |||
[[File:Theadminbus.gif]] '''The Adminbus'''<br> | |||
[[File:Thealenath.gif]] '''The Ale Nath'''<br> | |||
[[File:Thebark.gif]] '''The Bark'''<br> | |||
[[File:Thecavern.gif]] '''The Cavern'''<br> | |||
[[File:Thecoderbus.gif]] '''The Coderbus'''<br> | |||
[[File:Thedrunkcarp.gif]] '''The Drunk Carp'''<br> | |||
[[File:Thegoose.gif]] '''The Goose'''<br> | |||
[[File:Thegreytide.gif]] '''The Greytide'''<br> | |||
[[File:Theharmbaton.gif]] '''The Harmbaton'''<br> | |||
[[File:Thelightbulb.gif]] '''The Lightbulb'''<br> | |||
[[File:Thenest.gif]] '''The Nest'''<br> | |||
[[File:Thenet.gif]] '''The Net'''<br> | |||
[[File:Theouterspess.gif]] '''The Outer Spess'''<br> | |||
[[File:Theshaken.gif]] '''The Shaken'''<br> | |||
[[File:Thesingulo.gif]] '''The Singulo'''<br> | |||
[[File:Thesyndicat.gif]] '''The SyndiCat'''<br> | |||
[[File:Thewretchedhive.gif]] '''The Wretched Hive'''<br> | |||
[[File:Vladssaladbar.gif]] '''Vlad's Salad Bar'''<br> | |||
[[File:Little_treats.gif]] '''Little Treats Tea Room'''<br> | |||
[[File:Le_cafe_silencieux.gif]] '''Le Café Silencieux'''<br> | |||
[[File:Maltroach.gif]] '''Maltroach'''<br> | |||
[[File:Rock-bottom.gif]] '''Rock Bottom'''<br> | |||
[[File:The-assembly-line.gif]] '''The Assembly Line'''<br> | |||
[[File:Bargonia.gif]] '''Bargonia'''<br> | |||
[[File:Cult-cove.gif]] '''Cult Cove'''<br> | |||
[[File:Neon-flamingo.gif]] '''Neon Flamingo'''<br> | |||
[[File:Slowdive.gif]] '''Slowdive''' | |||
Special circumstances will result in one of the following bar signs:<br> | |||
[[File:Emptybarsign.png]] <br> | |||
[[File:Empbarsign.gif]] | |||
</div> | |||
</div> | |||
== The Bar == | |||
[[File:Bar_delta.png]] | |||
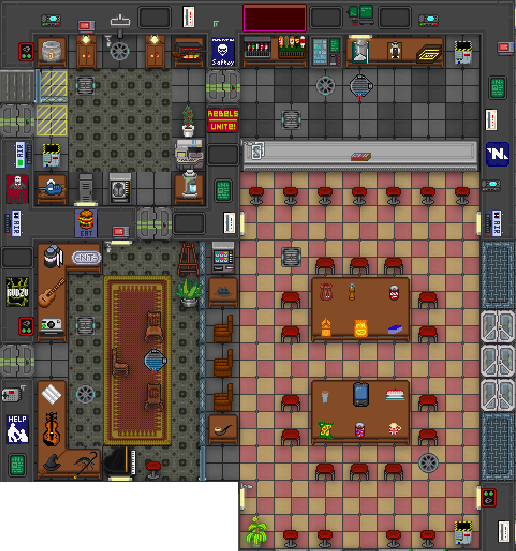
The bar contains a seating area, a theater, a bar and a private backroom for the bartender. | |||
The seating area hosts two large wooden tables in the center of the room, each surrounded by stools. Each table has a number of entertainment items on it - a pAI, drinks, cards, etc. | |||
The theater is to the west of the seating area and is where the mime and clown perform. It contains a few different instruments, some soap and clothing items. Just perfect for a performer! | |||
The bar itself (located to the north) is simplistic, having the usual items (Booze-O-Mat, drinks vendor, shaker). | |||
The backroom is located to the west of the bar or north of the theater. | |||
</tab> | |||
<tab style="width:100%" name="EclipseStation"> | |||
{{Location | |||
|headerbgcolor=#92b26d | |||
|headerfontcolor = black | |||
|image=Bar_box.png | |||
|location=Bar | |||
|description=Relax and have a drink or two. | |||
|purpose=Host barfights and get drunk. | |||
|items=A [[Piano|piano]], Booze-O-Mat, slot machines and arcades. | |||
|workers=[[Bartender]] | |||
|access=[[Bartender]] for the bar | |||
|exits=North-west to the [[Theatre]], north to [[maintenance|Bar Maintenance]], east to [[Kitchen]], south to Port Primary Hallway, west to the [[Dormitory]] | |||
|department=Recreational | |||
|footerbgcolor=#92b26d | |||
|footerfontcolor = black | |||
}} | |||
Welcome to the Maltese Falcon Bar & Grill! | |||
The bar is located in the north-east corner of the station, and is adjacent to the [[Kitchen]]. It is the spawn point and workplace of Pun Pun the Monkey (rip deempisi) and the [[Bartender]]. Be careful, as [[Medical Doctor]]s come here to steal every last drop of the Bar's booze. They will stay there until all of the Pan Galactic Gargle Blasters are completely chugged away. | |||
By default the bar's sign will be chosen randomly, but the bartender can choose whichever one he wants to be displayed by interacting with the sign. | |||
<div class="toccolours mw-collapsible mw-collapsed" style="width:800px"> | |||
'''Bar Signs | |||
<div class="mw-collapsible-content"> | |||
[[File:Alohasnackbar.gif]] '''Aloha Snackbar!'''<br> | |||
[[File:Combocafe.gif]] '''Combo Cafe'''<br> | |||
[[File:Emergencyrumparty.gif]] '''Emergency Rum Party!'''<br> | |||
[[File:Honkednloaded.gif]] '''Honked 'n Loaded'''<br> | |||
[[File:Maidcafe.gif]] '''Maid Cafe'''<br> | |||
[[File:Maltesefalcon.gif]] '''Maltese Falcon'''<br> | |||
[[File:Officerbeersky.gif]] '''Officer Beersky'''<br> | |||
[[File:Oldcockinn.gif]] '''Old Cock Inn'''<br> | |||
[[File:Robustacafe.gif]] '''Robusta Cafe'''<br> | |||
[[File:Scotchservinwillys.gif]] '''Scotch Servin' Willys'''<br> | |||
[[File:Slipperyshots.gif]] '''Slippery Shots'''<br> | |||
[[File:Theadminbus.gif]] '''The Adminbus'''<br> | |||
[[File:Thealenath.gif]] '''The Ale Nath'''<br> | |||
[[File:Thebark.gif]] '''The Bark'''<br> | |||
[[File:Thecavern.gif]] '''The Cavern'''<br> | |||
[[File:Thecoderbus.gif]] '''The Coderbus'''<br> | |||
[[File:Thedrunkcarp.gif]] '''The Drunk Carp'''<br> | |||
[[File:Thegoose.gif]] '''The Goose'''<br> | |||
[[File:Thegreytide.gif]] '''The Greytide'''<br> | |||
[[File:Theharmbaton.gif]] '''The Harmbaton'''<br> | |||
[[File:Thelightbulb.gif]] '''The Lightbulb'''<br> | |||
[[File:Thenest.gif]] '''The Nest'''<br> | |||
[[File:Thenet.gif]] '''The Net'''<br> | |||
[[File:Theouterspess.gif]] '''The Outer Spess'''<br> | |||
[[File:Theshaken.gif]] '''The Shaken'''<br> | |||
[[File:Thesingulo.gif]] '''The Singulo'''<br> | |||
[[File:Thesyndicat.gif]] '''The SyndiCat'''<br> | |||
[[File:Thewretchedhive.gif]] '''The Wretched Hive'''<br> | |||
[[File:Vladssaladbar.gif]] '''Vlad's Salad Bar'''<br> | |||
[[File:Little_treats.gif]] '''Little Treats Tea Room'''<br> | |||
[[File:Le_cafe_silencieux.gif]] '''Le Café Silencieux'''<br> | |||
[[File:Maltroach.gif]] '''Maltroach'''<br> | |||
[[File:Rock-bottom.gif]] '''Rock Bottom'''<br> | |||
[[File:The-assembly-line.gif]] '''The Assembly Line'''<br> | |||
[[File:Bargonia.gif]] '''Bargonia'''<br> | |||
[[File:Cult-cove.gif]] '''Cult Cove'''<br> | |||
[[File:Neon-flamingo.gif]] '''Neon Flamingo'''<br> | |||
[[File:Slowdive.gif]] '''Slowdive''' | |||
Special circumstances will result in one of the following bar signs:<br> | |||
[[File:Emptybarsign.png]] <br> | |||
[[File:Empbarsign.gif]] | |||
</div> | |||
</div> | |||
Eclipsestation has a number of different bar layouts. The [[Bartender]] can choose their preferred layout in game preferences. | |||
==Beach Bar== | |||
[[File:BarEclipse_Beach.png]] | |||
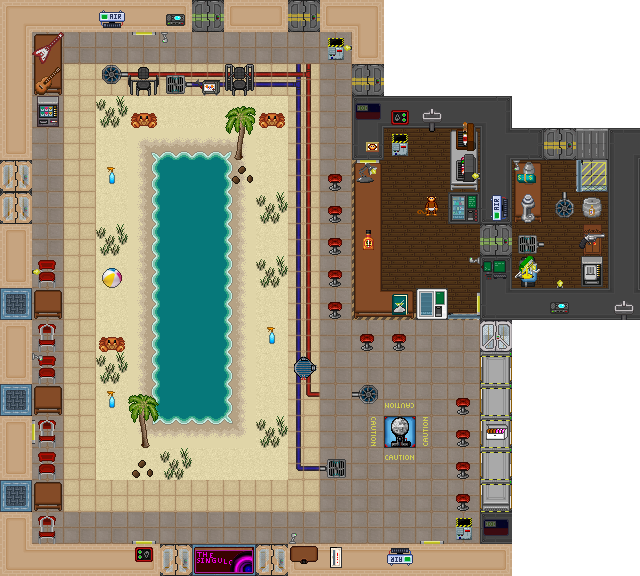
A peaceful bar featuring a sandy beach. | |||
There are three tables along the western wall. Each table comes with enough seats for two people, making this a perfect place for a date with beach nearby. Scattered around the beach are coconuts, palm trees, tanning lotion and a beach ball - you may even find a crab or two! To the north are weight machines and instruments for those not interested in the beautiful water view. | |||
The bar, located to the east, contains seating for up to seven visitors. You will be greeted by Pun Pun on your arrival, and the bartender if he's not already drunk off the booze in his personal beer keg. You will need Bar access <s>or just climb over the tables</s> to enter into the main section of the bar. This contains a Booze-O-Mat and all the tools the [[Bartender]] needs to mix and serve drinks. | |||
The private room is located just east of the bar, and requires Bar access to enter. This is where beer kegs are stored and [[Cult|suspicious]] [[Changeling|activities]] take place. As well as that there are two lockers, a clothing vendor and some spare space cash. | |||
==Casino Bar== | |||
[[File:BarEclipse Casino.png]] | |||
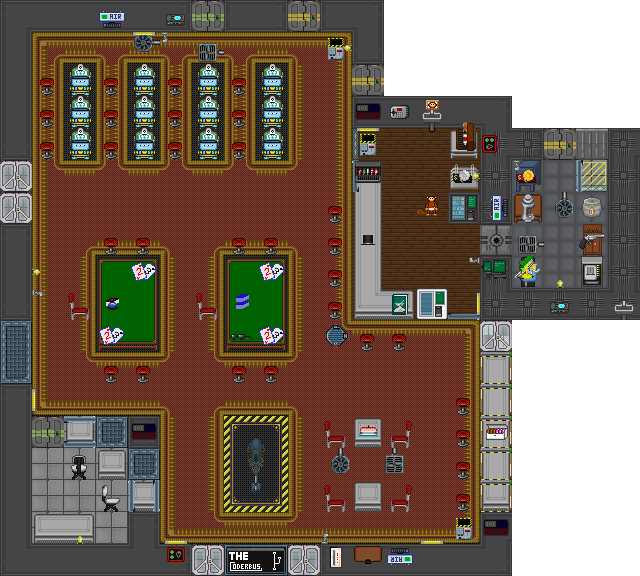
Plenty of space for uno and gambling. | |||
This bar features slot machines and gambling tables. The tables come pre-equipped with cards and a turn tracker - just remember to bring your own money and you're all set! To the south of the tables are a speedbike display and two tables. | |||
The bar, located to the east, contains seating for up to six visitors. You will be greeted by Pun Pun on your arrival, and the bartender if he's not already drunk off the booze in his personal beer keg. You will need Bar access <s>or just climb over the tables</s> to enter into the main section of the bar. This contains a Booze-O-Mat and all the tools the [[Bartender]] needs to mix and serve drinks. | |||
The private room is located just east of the bar, and requires Bar access to enter. This is where beer kegs are stored and [[Cult|suspicious]] [[Changeling|activities]] take place. As well as that there are two lockers, a clothing vendor and a vault. | |||
</tab> | |||
<tab style="width:100%" name="KiloStation"> | |||
{{Location | |||
|headerbgcolor=#92b26d | |||
|headerfontcolor=black | |||
|image=Bar_Kilo.png | |||
|location=Bar | |||
|description=Relax and have a drink or two. | |||
|purpose=Host barfights and get drunk. | |||
|items=Jukebox, Booze-O-Mat, tables, a wide assortment of alcoholic drinks | |||
|workers=[[Bartender]] | |||
|access=[[Bartender]] for the bar | |||
|exits=North to Fore Primary Hallway, east to [[Maintenance|Central Maintenance]], south to the [[Library]], west to Port Primary Hallway | |||
|department=Recreational | |||
|footerbgcolor=#92b26d | |||
|footerfontcolor=black | |||
}} | |||
Welcome to the Maltese Falcon Bar & Grill! | |||
The bar is located in the centre of the station, near the [[Library]]. It is the spawn point and workplace of the [[Bartender]]. The back room requires Bar access. Be careful, as [[Medical Doctor]]s come here to steal every last drop of the Bar's booze. They will stay there until all of the Pan Galactic Gargle Blasters are completely chugged away. | |||
By default the bar's sign will be chosen randomly, but the bartender can choose whichever one he wants to be displayed by interacting with the sign. | |||
<div class="toccolours mw-collapsible mw-collapsed" style="width:800px"> | |||
'''Bar Signs | |||
<div class="mw-collapsible-content"> | |||
[[File:Alohasnackbar.gif]] '''Aloha Snackbar!'''<br> | |||
[[File:Combocafe.gif]] '''Combo Cafe'''<br> | |||
[[File:Emergencyrumparty.gif]] '''Emergency Rum Party!'''<br> | |||
[[File:Honkednloaded.gif]] '''Honked 'n Loaded'''<br> | |||
[[File:Maidcafe.gif]] '''Maid Cafe'''<br> | |||
[[File:Maltesefalcon.gif]] '''Maltese Falcon'''<br> | |||
[[File:Officerbeersky.gif]] '''Officer Beersky'''<br> | |||
[[File:Oldcockinn.gif]] '''Old Cock Inn'''<br> | |||
[[File:Robustacafe.gif]] '''Robusta Cafe'''<br> | |||
[[File:Scotchservinwillys.gif]] '''Scotch Servin' Willys'''<br> | |||
[[File:Slipperyshots.gif]] '''Slippery Shots'''<br> | |||
[[File:Theadminbus.gif]] '''The Adminbus'''<br> | |||
[[File:Thealenath.gif]] '''The Ale Nath'''<br> | |||
[[File:Thebark.gif]] '''The Bark'''<br> | |||
[[File:Thecavern.gif]] '''The Cavern'''<br> | |||
[[File:Thecoderbus.gif]] '''The Coderbus'''<br> | |||
[[File:Thedrunkcarp.gif]] '''The Drunk Carp'''<br> | |||
[[File:Thegoose.gif]] '''The Goose'''<br> | |||
[[File:Thegreytide.gif]] '''The Greytide'''<br> | |||
[[File:Theharmbaton.gif]] '''The Harmbaton'''<br> | |||
[[File:Thelightbulb.gif]] '''The Lightbulb'''<br> | |||
[[File:Thenest.gif]] '''The Nest'''<br> | |||
[[File:Thenet.gif]] '''The Net'''<br> | |||
[[File:Theouterspess.gif]] '''The Outer Spess'''<br> | |||
[[File:Theshaken.gif]] '''The Shaken'''<br> | |||
[[File:Thesingulo.gif]] '''The Singulo'''<br> | |||
[[File:Thesyndicat.gif]] '''The SyndiCat'''<br> | |||
[[File:Thewretchedhive.gif]] '''The Wretched Hive'''<br> | |||
[[File:Vladssaladbar.gif]] '''Vlad's Salad Bar'''<br> | |||
[[File:Little_treats.gif]] '''Little Treats Tea Room'''<br> | |||
[[File:Le_cafe_silencieux.gif]] '''Le Café Silencieux'''<br> | |||
[[File:Maltroach.gif]] '''Maltroach'''<br> | |||
[[File:Rock-bottom.gif]] '''Rock Bottom'''<br> | |||
[[File:The-assembly-line.gif]] '''The Assembly Line'''<br> | |||
[[File:Bargonia.gif]] '''Bargonia'''<br> | |||
[[File:Cult-cove.gif]] '''Cult Cove'''<br> | |||
[[File:Neon-flamingo.gif]] '''Neon Flamingo'''<br> | |||
[[File:Slowdive.gif]] '''Slowdive''' | |||
Special circumstances will result in one of the following bar signs:<br> | |||
[[File:Emptybarsign.png]]<br> | |||
[[File:Empbarsign.gif]] | |||
</div> | |||
</div> | |||
==The Bar== | |||
[[File:Bar_Kilo.png]] | |||
The bar contains a seating area, a bar and a private backroom for the bartender. | |||
The seating area hosts a large wooden table in the center of the room, surrounded by chairs. The table has a pAI on it, and bookcases to the left. | |||
The bar itself (located to the east) is simplistic, having the usual items (Booze-O-Mat, drinks vendor, shaker). | |||
The backroom is located to the south of the bar. | |||
</tab> | |||
<tab style="width:100%" name="MetaStation"> | |||
{{Location | |||
|headerbgcolor=#92b26d | |||
|headerfontcolor = black | |||
|image=Bar_meta.png | |||
|location=Bar | |||
|description=Relax and have a drink or two. | |||
|purpose=Host barfights and get drunk. | |||
|items=Booze-O-Mat, seatings at kitchen and bar counter. | |||
|workers=[[Bartender]] | |||
|access=[[Bartender]] for the bar | |||
|exits=West to Central Primary Hallway, east to the [[Theatre]], south to [[Kitchen]] | |||
|department=Recreational | |||
|footerbgcolor=#92b26d | |||
|footerfontcolor = black | |||
}} | |||
Welcome to the Maltese Falcon Bar & Grill! | |||
The bar is located on the eastern side (starboard corridor) of the station, and is adjacent to the Kitchen. It is the spawn point and workplace of Pun Pun the Monkey (rip deempisi) and the [[Bartender]]. The bar door and back room all require Bar access. Be careful, as [[Medical Doctor]]s come here to steal every last drop of the Bar's booze. They will stay there until all of the Pan Galactic Gargle Blasters are completely chugged away. | |||
By default the bar's sign will be chosen randomly, but the bartender can choose whichever one he wants to be displayed by interacting with the sign. | |||
<div class="toccolours mw-collapsible mw-collapsed" style="width:800px"> | |||
'''Bar Signs | |||
<div class="mw-collapsible-content"> | |||
[[File:Alohasnackbar.gif]] '''Aloha Snackbar!'''<br> | |||
[[File:Combocafe.gif]] '''Combo Cafe'''<br> | |||
[[File:Emergencyrumparty.gif]] '''Emergency Rum Party!'''<br> | |||
[[File:Honkednloaded.gif]] '''Honked 'n Loaded'''<br> | |||
[[File:Maidcafe.gif]] '''Maid Cafe'''<br> | |||
[[File:Maltesefalcon.gif]] '''Maltese Falcon'''<br> | |||
[[File:Officerbeersky.gif]] '''Officer Beersky'''<br> | |||
[[File:Oldcockinn.gif]] '''Old Cock Inn'''<br> | |||
[[File:Robustacafe.gif]] '''Robusta Cafe'''<br> | |||
[[File:Scotchservinwillys.gif]] '''Scotch Servin' Willys'''<br> | |||
[[File:Slipperyshots.gif]] '''Slippery Shots'''<br> | |||
[[File:Theadminbus.gif]] '''The Adminbus'''<br> | |||
[[File:Thealenath.gif]] '''The Ale Nath'''<br> | |||
[[File:Thebark.gif]] '''The Bark'''<br> | |||
[[File:Thecavern.gif]] '''The Cavern'''<br> | |||
[[File:Thecoderbus.gif]] '''The Coderbus'''<br> | |||
[[File:Thedrunkcarp.gif]] '''The Drunk Carp'''<br> | |||
[[File:Thegoose.gif]] '''The Goose'''<br> | |||
[[File:Thegreytide.gif]] '''The Greytide'''<br> | |||
[[File:Theharmbaton.gif]] '''The Harmbaton'''<br> | |||
[[File:Thelightbulb.gif]] '''The Lightbulb'''<br> | |||
[[File:Thenest.gif]] '''The Nest'''<br> | |||
[[File:Thenet.gif]] '''The Net'''<br> | |||
[[File:Theouterspess.gif]] '''The Outer Spess'''<br> | |||
[[File:Theshaken.gif]] '''The Shaken'''<br> | |||
[[File:Thesingulo.gif]] '''The Singulo'''<br> | |||
[[File:Thesyndicat.gif]] '''The SyndiCat'''<br> | |||
[[File:Thewretchedhive.gif]] '''The Wretched Hive'''<br> | |||
[[File:Vladssaladbar.gif]] '''Vlad's Salad Bar'''<br> | |||
[[File:Little_treats.gif]] '''Little Treats Tea Room'''<br> | |||
[[File:Le_cafe_silencieux.gif]] '''Le Café Silencieux'''<br> | |||
[[File:Maltroach.gif]] '''Maltroach'''<br> | |||
[[File:Rock-bottom.gif]] '''Rock Bottom'''<br> | |||
[[File:The-assembly-line.gif]] '''The Assembly Line'''<br> | |||
[[File:Bargonia.gif]] '''Bargonia'''<br> | |||
[[File:Cult-cove.gif]] '''Cult Cove'''<br> | |||
[[File:Neon-flamingo.gif]] '''Neon Flamingo'''<br> | |||
[[File:Slowdive.gif]] '''Slowdive''' | |||
Special circumstances will result in one of the following bar signs:<br> | |||
[[File:Emptybarsign.png]] <br> | |||
[[File:Empbarsign.gif]] | |||
</div> | |||
</div> | |||
== The Bar == | |||
[[File:Bar_meta.png]] | |||
This bar contains a seating area, a bar and a private backroom for the bartender. | |||
The seating area is shared by people waiting on drinks, food and walking to the theater so expect a variety of characters to be in here. The bar side has six seats and more space to stand if that's not enough for you. | |||
The bar contains some condiments, cigars, a Booze-O-Mat and all the tools the [[Bartender]] needs to mix and serve drinks. | |||
The backroom is where beer kegs are stored and [[Cult|suspicious]] [[Changeling|activities]] take place. There is also a condimaster, a booze storage closet and a clothing vendor. | |||
</tab> | |||
<tab style="width:100%" name="NVS Gax"> | |||
{{Location | |||
|headerbgcolor=#92b26d | |||
|headerfontcolor = black | |||
|image=Bar_gax.png | |||
|location=Bar | |||
|description=Relax and have a drink or two. | |||
|purpose=Host barfights and get drunk. | |||
|items=Slot machine, a wide assortment of alcoholic drinks | |||
|workers=[[Bartender]] | |||
|access=[[Bartender]] for the bar | |||
|exits=South to Starboard Primary Hallway, north to the kitchen, north-west to hydroponics | |||
|department=Recreational | |||
|footerbgcolor=#92b26d | |||
|footerfontcolor = black | |||
}} | |||
Welcome to the Maltese Falcon Bar & Grill! | |||
The bar is located to the east of the station, and is adjacent to the Kitchen. It is the spawn point and workplace of the [[Bartender]]. The bar door and back room all require Bar access. Be careful, as [[Medical Doctor]]s come here to steal every last drop of the Bar's booze. They will stay there until all of the Pan Galactic Gargle Blasters are completely chugged away. | |||
By default the bar's sign will be chosen randomly, but the bartender can choose whichever one he wants to be displayed by interacting with the sign. | |||
<div class="toccolours mw-collapsible mw-collapsed" style="width:800px"> | |||
'''Bar Signs | |||
<div class="mw-collapsible-content"> | |||
[[File:Alohasnackbar.gif]] '''Aloha Snackbar!'''<br> | |||
[[File:Combocafe.gif]] '''Combo Cafe'''<br> | |||
[[File:Emergencyrumparty.gif]] '''Emergency Rum Party!'''<br> | |||
[[File:Honkednloaded.gif]] '''Honked 'n Loaded'''<br> | |||
[[File:Maidcafe.gif]] '''Maid Cafe'''<br> | |||
[[File:Maltesefalcon.gif]] '''Maltese Falcon'''<br> | |||
[[File:Officerbeersky.gif]] '''Officer Beersky'''<br> | |||
[[File:Oldcockinn.gif]] '''Old Cock Inn'''<br> | |||
[[File:Robustacafe.gif]] '''Robusta Cafe'''<br> | |||
[[File:Scotchservinwillys.gif]] '''Scotch Servin' Willys'''<br> | |||
[[File:Slipperyshots.gif]] '''Slippery Shots'''<br> | |||
[[File:Theadminbus.gif]] '''The Adminbus'''<br> | |||
[[File:Thealenath.gif]] '''The Ale Nath'''<br> | |||
[[File:Thebark.gif]] '''The Bark'''<br> | |||
[[File:Thecavern.gif]] '''The Cavern'''<br> | |||
[[File:Thecoderbus.gif]] '''The Coderbus'''<br> | |||
[[File:Thedrunkcarp.gif]] '''The Drunk Carp'''<br> | |||
[[File:Thegoose.gif]] '''The Goose'''<br> | |||
[[File:Thegreytide.gif]] '''The Greytide'''<br> | |||
[[File:Theharmbaton.gif]] '''The Harmbaton'''<br> | |||
[[File:Thelightbulb.gif]] '''The Lightbulb'''<br> | |||
[[File:Thenest.gif]] '''The Nest'''<br> | |||
[[File:Thenet.gif]] '''The Net'''<br> | |||
[[File:Theouterspess.gif]] '''The Outer Spess'''<br> | |||
[[File:Theshaken.gif]] '''The Shaken'''<br> | |||
[[File:Thesingulo.gif]] '''The Singulo'''<br> | |||
[[File:Thesyndicat.gif]] '''The SyndiCat'''<br> | |||
[[File:Thewretchedhive.gif]] '''The Wretched Hive'''<br> | |||
[[File:Vladssaladbar.gif]] '''Vlad's Salad Bar'''<br> | |||
[[File:Little_treats.gif]] '''Little Treats Tea Room'''<br> | |||
[[File:Le_cafe_silencieux.gif]] '''Le Café Silencieux'''<br> | |||
[[File:Maltroach.gif]] '''Maltroach'''<br> | |||
[[File:Rock-bottom.gif]] '''Rock Bottom'''<br> | |||
[[File:The-assembly-line.gif]] '''The Assembly Line'''<br> | |||
[[File:Bargonia.gif]] '''Bargonia'''<br> | |||
[[File:Cult-cove.gif]] '''Cult Cove'''<br> | |||
[[File:Neon-flamingo.gif]] '''Neon Flamingo'''<br> | |||
[[File:Slowdive.gif]] '''Slowdive''' | |||
Special circumstances will result in one of the following bar signs:<br> | |||
[[File:Emptybarsign.png]] <br> | |||
[[File:Empbarsign.gif]] | |||
</div> | |||
</div> | |||
== The Bar == | |||
[[File:Bar_gax.png]] | |||
The bar contains a seating area, a bar and a private backroom for the bartender. | |||
The seating area is shared by both the bar and kitchen, containing one slot machine and a disposal unit. | |||
The bar is located to the north of the [[Research Division]]. | |||
</tab> | |||
<tab style="width:100%" name="OmegaStation"> | |||
{{Location | |||
|headerbgcolor=#92b26d | |||
|headerfontcolor=black | |||
|image=Bar_omega.png | |||
|location=Bar | |||
|description=Relax and have a drink or two. | |||
|purpose=Host barfights and get drunk. | |||
|items=Booze-O-Mat, seatings at kitchen and bar counter. | |||
|workers=[[Bartender]] | |||
|access=[[Bartender]] for the bar | |||
|exits=North to Atrium, east to [[Maintenance|Central Starboard Maintenance]] | |||
|department=Recreational | |||
|footerbgcolor=#92b26d | |||
|footerfontcolor=black | |||
}} | |||
Welcome to the Maltese Falcon Bar & Grill! | |||
The bar is located in the center of the station, and is adjacent to the Kitchen. It is the spawn point and workplace of the [[Bartender]]. The bar door and back room all require Bar access. Be careful, as [[Medical Doctor]]s come here to steal every last drop of the Bar's booze. They will stay there until all of the Pan Galactic Gargle Blasters are completely chugged away. | |||
By default the bar's sign will be chosen randomly, but the bartender can choose whichever one he wants to be displayed by interacting with the sign. | |||
<div class="toccolours mw-collapsible mw-collapsed" style="width:800px"> | |||
'''Bar Signs | |||
<div class="mw-collapsible-content"> | |||
[[File:Alohasnackbar.gif]] '''Aloha Snackbar!'''<br> | |||
[[File:Combocafe.gif]] '''Combo Cafe'''<br> | |||
[[File:Emergencyrumparty.gif]] '''Emergency Rum Party!'''<br> | |||
[[File:Honkednloaded.gif]] '''Honked 'n Loaded'''<br> | |||
[[File:Maidcafe.gif]] '''Maid Cafe'''<br> | |||
[[File:Maltesefalcon.gif]] '''Maltese Falcon'''<br> | |||
[[File:Officerbeersky.gif]] '''Officer Beersky'''<br> | |||
[[File:Oldcockinn.gif]] '''Old Cock Inn'''<br> | |||
[[File:Robustacafe.gif]] '''Robusta Cafe'''<br> | |||
[[File:Scotchservinwillys.gif]] '''Scotch Servin' Willys'''<br> | |||
[[File:Slipperyshots.gif]] '''Slippery Shots'''<br> | |||
[[File:Theadminbus.gif]] '''The Adminbus'''<br> | |||
[[File:Thealenath.gif]] '''The Ale Nath'''<br> | |||
[[File:Thebark.gif]] '''The Bark'''<br> | |||
[[File:Thecavern.gif]] '''The Cavern'''<br> | |||
[[File:Thecoderbus.gif]] '''The Coderbus'''<br> | |||
[[File:Thedrunkcarp.gif]] '''The Drunk Carp'''<br> | |||
[[File:Thegoose.gif]] '''The Goose'''<br> | |||
[[File:Thegreytide.gif]] '''The Greytide'''<br> | |||
[[File:Theharmbaton.gif]] '''The Harmbaton'''<br> | |||
[[File:Thelightbulb.gif]] '''The Lightbulb'''<br> | |||
[[File:Thenest.gif]] '''The Nest'''<br> | |||
[[File:Thenet.gif]] '''The Net'''<br> | |||
[[File:Theouterspess.gif]] '''The Outer Spess'''<br> | |||
[[File:Theshaken.gif]] '''The Shaken'''<br> | |||
[[File:Thesingulo.gif]] '''The Singulo'''<br> | |||
[[File:Thesyndicat.gif]] '''The SyndiCat'''<br> | |||
[[File:Thewretchedhive.gif]] '''The Wretched Hive'''<br> | |||
[[File:Vladssaladbar.gif]] '''Vlad's Salad Bar'''<br> | |||
[[File:Little_treats.gif]] '''Little Treats Tea Room'''<br> | |||
[[File:Le_cafe_silencieux.gif]] '''Le Café Silencieux'''<br> | |||
[[File:Maltroach.gif]] '''Maltroach'''<br> | |||
[[File:Rock-bottom.gif]] '''Rock Bottom'''<br> | |||
[[File:The-assembly-line.gif]] '''The Assembly Line'''<br> | |||
[[File:Bargonia.gif]] '''Bargonia'''<br> | |||
[[File:Cult-cove.gif]] '''Cult Cove'''<br> | |||
[[File:Neon-flamingo.gif]] '''Neon Flamingo'''<br> | |||
[[File:Slowdive.gif]] '''Slowdive''' | |||
Special circumstances will result in one of the following bar signs:<br> | |||
[[File:Emptybarsign.png]] <br> | |||
[[File:Empbarsign.gif]] | |||
</div> | |||
</div> | |||
==The Bar== | |||
[[File:Bar_omega.png]] | |||
The bar contains a seating area, a bar and a private backroom for the bartender. | |||
The seating area is shared by both the bar and kitchen, as well as people using it as a shortcut through the station. It has a long table, with a few food items on it. | |||
The bar is rather small, but has enough seating for six people. It has some drink machines, a mixer and some cigars. The bar is located to the south-east of the Atrium. | |||
The backroom is located east of the bar and has a condimaster and a booze storage. | |||
</tab> | |||
</tabs> | |||
[[Category:locations]] | |||
{{Locations}} | {{Locations}} | ||
Latest revision as of 18:44, 1 January 2024
For the Guide to Drinks, click here.
For the Guide to the Bartender, click here.
| Bar | |
| Relax and have a drink or two. | |
| Purpose: | Host barfights and get drunk. |
| Key items: | A piano, Booze-O-Mat. |
| Workers: | Bartender |
| Access: | Bartender for the bar |
| Exits: | South to Starboard Primary Hallway, north to the Dormitory, north-east to maintenance, east to Kitchen |
| Recreational | |
Welcome to the Maltese Falcon Bar & Grill!
The bar is located on the eastern side (starboard corridor) of the station, and is adjacent to the Kitchen. It is the spawn point and workplace of Pun Pun the Monkey (rip deempisi) and the Bartender. Be careful, as Medical Doctors come here to steal every last drop of the Bar's booze. They will stay there until all of the Pan Galactic Gargle Blasters are completely chugged away.
By default the bar's sign will be chosen randomly, but the bartender can choose whichever one he wants to be displayed by interacting with the sign.
Bar Signs
![]() Aloha Snackbar!
Aloha Snackbar!
![]() Combo Cafe
Combo Cafe
![]() Emergency Rum Party!
Emergency Rum Party!
![]() Honked 'n Loaded
Honked 'n Loaded
![]() Maid Cafe
Maid Cafe
![]() Maltese Falcon
Maltese Falcon
![]() Officer Beersky
Officer Beersky
![]() Old Cock Inn
Old Cock Inn
![]() Robusta Cafe
Robusta Cafe
![]() Scotch Servin' Willys
Scotch Servin' Willys
![]() Slippery Shots
Slippery Shots
![]() The Adminbus
The Adminbus
![]() The Ale Nath
The Ale Nath
![]() The Bark
The Bark
![]() The Cavern
The Cavern
![]() The Coderbus
The Coderbus
![]() The Drunk Carp
The Drunk Carp
![]() The Goose
The Goose
![]() The Greytide
The Greytide
![]() The Harmbaton
The Harmbaton
![]() The Lightbulb
The Lightbulb
![]() The Nest
The Nest
![]() The Net
The Net
![]() The Outer Spess
The Outer Spess
![]() The Shaken
The Shaken
![]() The Singulo
The Singulo
![]() The SyndiCat
The SyndiCat
![]() The Wretched Hive
The Wretched Hive
![]() Vlad's Salad Bar
Vlad's Salad Bar
![]() Little Treats Tea Room
Little Treats Tea Room
![]() Le Café Silencieux
Le Café Silencieux
![]() Maltroach
Maltroach
![]() Rock Bottom
Rock Bottom
![]() The Assembly Line
The Assembly Line
![]() Bargonia
Bargonia
![]() Cult Cove
Cult Cove
![]() Neon Flamingo
Neon Flamingo
![]() Slowdive
Slowdive
Special circumstances will result in one of the following bar signs:
![]()
![]()
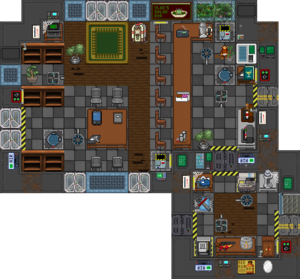
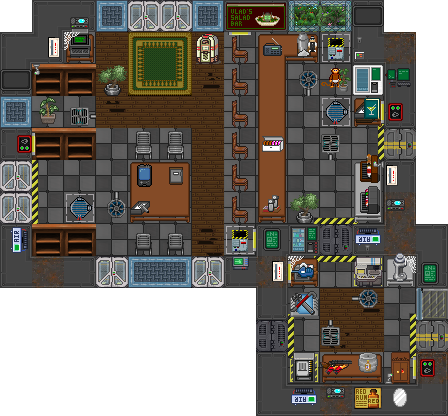
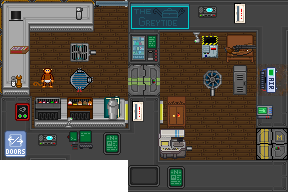
The bar features seating areas, a theater, a bar and a private room for the bartender.
The theater is located in the south-east area of the bar and gives host to the famous Honk Bot. There is also a variety of instruments for all your performance needs, including a piano. You will find plenty of space to decorate the stage. This is your chance to make your face well-known across the station!
The bar, located to the west, contains enough seating for plenty of visitors. You will be greeted by Pun Pun on your arrival, and the bartender if he's not already drunk off the booze. You will need Bar access or just climb over the tables to enter into the main section of the bar. This contains a Booze-O-Mat and all the tools the Bartender needs to mix and serve drinks.
The private room is located just north of the bar, and requires Bar access to enter. This is where suspicious activities take place. As well as that there are two lockers and a clothing vendor.
| Bar | |
| Relax and have a drink or two. | |
| Purpose: | Host barfights and get drunk. |
| Key items: | Musical instruments, Booze-O-Mat, tables, a wide assortment of alcoholic drinks |
| Workers: | Bartender |
| Access: | Bartender for the bar |
| Exits: | East to Fore Primary Hallway, south to the kitchen, west to the Service Hallway |
| Recreational | |
Welcome to the Maltese Falcon Bar & Grill!
The bar is located to the north of the station, and is adjacent to the Kitchen. It is the spawn point and workplace of the Bartender. The bar door and back room all require Bar access. Be careful, as Medical Doctors come here to steal every last drop of the Bar's booze. They will stay there until all of the Pan Galactic Gargle Blasters are completely chugged away.
By default the bar's sign will be chosen randomly, but the bartender can choose whichever one he wants to be displayed by interacting with the sign.
Bar Signs
![]() Aloha Snackbar!
Aloha Snackbar!
![]() Combo Cafe
Combo Cafe
![]() Emergency Rum Party!
Emergency Rum Party!
![]() Honked 'n Loaded
Honked 'n Loaded
![]() Maid Cafe
Maid Cafe
![]() Maltese Falcon
Maltese Falcon
![]() Officer Beersky
Officer Beersky
![]() Old Cock Inn
Old Cock Inn
![]() Robusta Cafe
Robusta Cafe
![]() Scotch Servin' Willys
Scotch Servin' Willys
![]() Slippery Shots
Slippery Shots
![]() The Adminbus
The Adminbus
![]() The Ale Nath
The Ale Nath
![]() The Bark
The Bark
![]() The Cavern
The Cavern
![]() The Coderbus
The Coderbus
![]() The Drunk Carp
The Drunk Carp
![]() The Goose
The Goose
![]() The Greytide
The Greytide
![]() The Harmbaton
The Harmbaton
![]() The Lightbulb
The Lightbulb
![]() The Nest
The Nest
![]() The Net
The Net
![]() The Outer Spess
The Outer Spess
![]() The Shaken
The Shaken
![]() The Singulo
The Singulo
![]() The SyndiCat
The SyndiCat
![]() The Wretched Hive
The Wretched Hive
![]() Vlad's Salad Bar
Vlad's Salad Bar
![]() Little Treats Tea Room
Little Treats Tea Room
![]() Le Café Silencieux
Le Café Silencieux
![]() Maltroach
Maltroach
![]() Rock Bottom
Rock Bottom
![]() The Assembly Line
The Assembly Line
![]() Bargonia
Bargonia
![]() Cult Cove
Cult Cove
![]() Neon Flamingo
Neon Flamingo
![]() Slowdive
Slowdive
Special circumstances will result in one of the following bar signs:
![]()
![]()
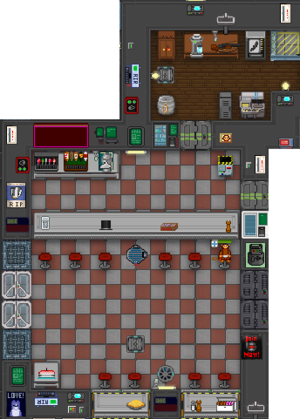
The Bar
The bar contains a seating area, a theater, a bar and a private backroom for the bartender.
The seating area hosts two large wooden tables in the center of the room, each surrounded by stools. Each table has a number of entertainment items on it - a pAI, drinks, cards, etc.
The theater is to the west of the seating area and is where the mime and clown perform. It contains a few different instruments, some soap and clothing items. Just perfect for a performer!
The bar itself (located to the north) is simplistic, having the usual items (Booze-O-Mat, drinks vendor, shaker).
The backroom is located to the west of the bar or north of the theater.
| Bar | |
| Relax and have a drink or two. | |
| Purpose: | Host barfights and get drunk. |
| Key items: | A piano, Booze-O-Mat, slot machines and arcades. |
| Workers: | Bartender |
| Access: | Bartender for the bar |
| Exits: | North-west to the Theatre, north to Bar Maintenance, east to Kitchen, south to Port Primary Hallway, west to the Dormitory |
| Recreational | |
Welcome to the Maltese Falcon Bar & Grill!
The bar is located in the north-east corner of the station, and is adjacent to the Kitchen. It is the spawn point and workplace of Pun Pun the Monkey (rip deempisi) and the Bartender. Be careful, as Medical Doctors come here to steal every last drop of the Bar's booze. They will stay there until all of the Pan Galactic Gargle Blasters are completely chugged away.
By default the bar's sign will be chosen randomly, but the bartender can choose whichever one he wants to be displayed by interacting with the sign.
Bar Signs
![]() Aloha Snackbar!
Aloha Snackbar!
![]() Combo Cafe
Combo Cafe
![]() Emergency Rum Party!
Emergency Rum Party!
![]() Honked 'n Loaded
Honked 'n Loaded
![]() Maid Cafe
Maid Cafe
![]() Maltese Falcon
Maltese Falcon
![]() Officer Beersky
Officer Beersky
![]() Old Cock Inn
Old Cock Inn
![]() Robusta Cafe
Robusta Cafe
![]() Scotch Servin' Willys
Scotch Servin' Willys
![]() Slippery Shots
Slippery Shots
![]() The Adminbus
The Adminbus
![]() The Ale Nath
The Ale Nath
![]() The Bark
The Bark
![]() The Cavern
The Cavern
![]() The Coderbus
The Coderbus
![]() The Drunk Carp
The Drunk Carp
![]() The Goose
The Goose
![]() The Greytide
The Greytide
![]() The Harmbaton
The Harmbaton
![]() The Lightbulb
The Lightbulb
![]() The Nest
The Nest
![]() The Net
The Net
![]() The Outer Spess
The Outer Spess
![]() The Shaken
The Shaken
![]() The Singulo
The Singulo
![]() The SyndiCat
The SyndiCat
![]() The Wretched Hive
The Wretched Hive
![]() Vlad's Salad Bar
Vlad's Salad Bar
![]() Little Treats Tea Room
Little Treats Tea Room
![]() Le Café Silencieux
Le Café Silencieux
![]() Maltroach
Maltroach
![]() Rock Bottom
Rock Bottom
![]() The Assembly Line
The Assembly Line
![]() Bargonia
Bargonia
![]() Cult Cove
Cult Cove
![]() Neon Flamingo
Neon Flamingo
![]() Slowdive
Slowdive
Special circumstances will result in one of the following bar signs:
![]()
![]()
Eclipsestation has a number of different bar layouts. The Bartender can choose their preferred layout in game preferences.
Beach Bar
A peaceful bar featuring a sandy beach.
There are three tables along the western wall. Each table comes with enough seats for two people, making this a perfect place for a date with beach nearby. Scattered around the beach are coconuts, palm trees, tanning lotion and a beach ball - you may even find a crab or two! To the north are weight machines and instruments for those not interested in the beautiful water view.
The bar, located to the east, contains seating for up to seven visitors. You will be greeted by Pun Pun on your arrival, and the bartender if he's not already drunk off the booze in his personal beer keg. You will need Bar access or just climb over the tables to enter into the main section of the bar. This contains a Booze-O-Mat and all the tools the Bartender needs to mix and serve drinks.
The private room is located just east of the bar, and requires Bar access to enter. This is where beer kegs are stored and suspicious activities take place. As well as that there are two lockers, a clothing vendor and some spare space cash.
Casino Bar
Plenty of space for uno and gambling.
This bar features slot machines and gambling tables. The tables come pre-equipped with cards and a turn tracker - just remember to bring your own money and you're all set! To the south of the tables are a speedbike display and two tables.
The bar, located to the east, contains seating for up to six visitors. You will be greeted by Pun Pun on your arrival, and the bartender if he's not already drunk off the booze in his personal beer keg. You will need Bar access or just climb over the tables to enter into the main section of the bar. This contains a Booze-O-Mat and all the tools the Bartender needs to mix and serve drinks.
The private room is located just east of the bar, and requires Bar access to enter. This is where beer kegs are stored and suspicious activities take place. As well as that there are two lockers, a clothing vendor and a vault.
| Bar | |
| Relax and have a drink or two. | |
| Purpose: | Host barfights and get drunk. |
| Key items: | Jukebox, Booze-O-Mat, tables, a wide assortment of alcoholic drinks |
| Workers: | Bartender |
| Access: | Bartender for the bar |
| Exits: | North to Fore Primary Hallway, east to Central Maintenance, south to the Library, west to Port Primary Hallway |
| Recreational | |
Welcome to the Maltese Falcon Bar & Grill!
The bar is located in the centre of the station, near the Library. It is the spawn point and workplace of the Bartender. The back room requires Bar access. Be careful, as Medical Doctors come here to steal every last drop of the Bar's booze. They will stay there until all of the Pan Galactic Gargle Blasters are completely chugged away.
By default the bar's sign will be chosen randomly, but the bartender can choose whichever one he wants to be displayed by interacting with the sign.
Bar Signs
![]() Aloha Snackbar!
Aloha Snackbar!
![]() Combo Cafe
Combo Cafe
![]() Emergency Rum Party!
Emergency Rum Party!
![]() Honked 'n Loaded
Honked 'n Loaded
![]() Maid Cafe
Maid Cafe
![]() Maltese Falcon
Maltese Falcon
![]() Officer Beersky
Officer Beersky
![]() Old Cock Inn
Old Cock Inn
![]() Robusta Cafe
Robusta Cafe
![]() Scotch Servin' Willys
Scotch Servin' Willys
![]() Slippery Shots
Slippery Shots
![]() The Adminbus
The Adminbus
![]() The Ale Nath
The Ale Nath
![]() The Bark
The Bark
![]() The Cavern
The Cavern
![]() The Coderbus
The Coderbus
![]() The Drunk Carp
The Drunk Carp
![]() The Goose
The Goose
![]() The Greytide
The Greytide
![]() The Harmbaton
The Harmbaton
![]() The Lightbulb
The Lightbulb
![]() The Nest
The Nest
![]() The Net
The Net
![]() The Outer Spess
The Outer Spess
![]() The Shaken
The Shaken
![]() The Singulo
The Singulo
![]() The SyndiCat
The SyndiCat
![]() The Wretched Hive
The Wretched Hive
![]() Vlad's Salad Bar
Vlad's Salad Bar
![]() Little Treats Tea Room
Little Treats Tea Room
![]() Le Café Silencieux
Le Café Silencieux
![]() Maltroach
Maltroach
![]() Rock Bottom
Rock Bottom
![]() The Assembly Line
The Assembly Line
![]() Bargonia
Bargonia
![]() Cult Cove
Cult Cove
![]() Neon Flamingo
Neon Flamingo
![]() Slowdive
Slowdive
Special circumstances will result in one of the following bar signs:
![]()
![]()
The Bar
The bar contains a seating area, a bar and a private backroom for the bartender.
The seating area hosts a large wooden table in the center of the room, surrounded by chairs. The table has a pAI on it, and bookcases to the left.
The bar itself (located to the east) is simplistic, having the usual items (Booze-O-Mat, drinks vendor, shaker).
The backroom is located to the south of the bar.
| Bar | |
| Relax and have a drink or two. | |
| Purpose: | Host barfights and get drunk. |
| Key items: | Booze-O-Mat, seatings at kitchen and bar counter. |
| Workers: | Bartender |
| Access: | Bartender for the bar |
| Exits: | West to Central Primary Hallway, east to the Theatre, south to Kitchen |
| Recreational | |
Welcome to the Maltese Falcon Bar & Grill!
The bar is located on the eastern side (starboard corridor) of the station, and is adjacent to the Kitchen. It is the spawn point and workplace of Pun Pun the Monkey (rip deempisi) and the Bartender. The bar door and back room all require Bar access. Be careful, as Medical Doctors come here to steal every last drop of the Bar's booze. They will stay there until all of the Pan Galactic Gargle Blasters are completely chugged away.
By default the bar's sign will be chosen randomly, but the bartender can choose whichever one he wants to be displayed by interacting with the sign.
Bar Signs
![]() Aloha Snackbar!
Aloha Snackbar!
![]() Combo Cafe
Combo Cafe
![]() Emergency Rum Party!
Emergency Rum Party!
![]() Honked 'n Loaded
Honked 'n Loaded
![]() Maid Cafe
Maid Cafe
![]() Maltese Falcon
Maltese Falcon
![]() Officer Beersky
Officer Beersky
![]() Old Cock Inn
Old Cock Inn
![]() Robusta Cafe
Robusta Cafe
![]() Scotch Servin' Willys
Scotch Servin' Willys
![]() Slippery Shots
Slippery Shots
![]() The Adminbus
The Adminbus
![]() The Ale Nath
The Ale Nath
![]() The Bark
The Bark
![]() The Cavern
The Cavern
![]() The Coderbus
The Coderbus
![]() The Drunk Carp
The Drunk Carp
![]() The Goose
The Goose
![]() The Greytide
The Greytide
![]() The Harmbaton
The Harmbaton
![]() The Lightbulb
The Lightbulb
![]() The Nest
The Nest
![]() The Net
The Net
![]() The Outer Spess
The Outer Spess
![]() The Shaken
The Shaken
![]() The Singulo
The Singulo
![]() The SyndiCat
The SyndiCat
![]() The Wretched Hive
The Wretched Hive
![]() Vlad's Salad Bar
Vlad's Salad Bar
![]() Little Treats Tea Room
Little Treats Tea Room
![]() Le Café Silencieux
Le Café Silencieux
![]() Maltroach
Maltroach
![]() Rock Bottom
Rock Bottom
![]() The Assembly Line
The Assembly Line
![]() Bargonia
Bargonia
![]() Cult Cove
Cult Cove
![]() Neon Flamingo
Neon Flamingo
![]() Slowdive
Slowdive
Special circumstances will result in one of the following bar signs:
![]()
![]()
The Bar
This bar contains a seating area, a bar and a private backroom for the bartender.
The seating area is shared by people waiting on drinks, food and walking to the theater so expect a variety of characters to be in here. The bar side has six seats and more space to stand if that's not enough for you.
The bar contains some condiments, cigars, a Booze-O-Mat and all the tools the Bartender needs to mix and serve drinks.
The backroom is where beer kegs are stored and suspicious activities take place. There is also a condimaster, a booze storage closet and a clothing vendor.
| Bar | |
| Relax and have a drink or two. | |
| Purpose: | Host barfights and get drunk. |
| Key items: | Slot machine, a wide assortment of alcoholic drinks |
| Workers: | Bartender |
| Access: | Bartender for the bar |
| Exits: | South to Starboard Primary Hallway, north to the kitchen, north-west to hydroponics |
| Recreational | |
Welcome to the Maltese Falcon Bar & Grill!
The bar is located to the east of the station, and is adjacent to the Kitchen. It is the spawn point and workplace of the Bartender. The bar door and back room all require Bar access. Be careful, as Medical Doctors come here to steal every last drop of the Bar's booze. They will stay there until all of the Pan Galactic Gargle Blasters are completely chugged away.
By default the bar's sign will be chosen randomly, but the bartender can choose whichever one he wants to be displayed by interacting with the sign.
Bar Signs
![]() Aloha Snackbar!
Aloha Snackbar!
![]() Combo Cafe
Combo Cafe
![]() Emergency Rum Party!
Emergency Rum Party!
![]() Honked 'n Loaded
Honked 'n Loaded
![]() Maid Cafe
Maid Cafe
![]() Maltese Falcon
Maltese Falcon
![]() Officer Beersky
Officer Beersky
![]() Old Cock Inn
Old Cock Inn
![]() Robusta Cafe
Robusta Cafe
![]() Scotch Servin' Willys
Scotch Servin' Willys
![]() Slippery Shots
Slippery Shots
![]() The Adminbus
The Adminbus
![]() The Ale Nath
The Ale Nath
![]() The Bark
The Bark
![]() The Cavern
The Cavern
![]() The Coderbus
The Coderbus
![]() The Drunk Carp
The Drunk Carp
![]() The Goose
The Goose
![]() The Greytide
The Greytide
![]() The Harmbaton
The Harmbaton
![]() The Lightbulb
The Lightbulb
![]() The Nest
The Nest
![]() The Net
The Net
![]() The Outer Spess
The Outer Spess
![]() The Shaken
The Shaken
![]() The Singulo
The Singulo
![]() The SyndiCat
The SyndiCat
![]() The Wretched Hive
The Wretched Hive
![]() Vlad's Salad Bar
Vlad's Salad Bar
![]() Little Treats Tea Room
Little Treats Tea Room
![]() Le Café Silencieux
Le Café Silencieux
![]() Maltroach
Maltroach
![]() Rock Bottom
Rock Bottom
![]() The Assembly Line
The Assembly Line
![]() Bargonia
Bargonia
![]() Cult Cove
Cult Cove
![]() Neon Flamingo
Neon Flamingo
![]() Slowdive
Slowdive
Special circumstances will result in one of the following bar signs:
![]()
![]()
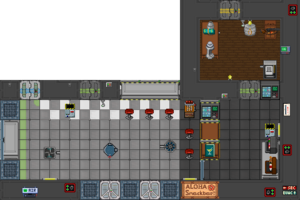
The Bar
The bar contains a seating area, a bar and a private backroom for the bartender.
The seating area is shared by both the bar and kitchen, containing one slot machine and a disposal unit.
The bar is located to the north of the Research Division.
| Bar | |
| Relax and have a drink or two. | |
| Purpose: | Host barfights and get drunk. |
| Key items: | Booze-O-Mat, seatings at kitchen and bar counter. |
| Workers: | Bartender |
| Access: | Bartender for the bar |
| Exits: | North to Atrium, east to Central Starboard Maintenance |
| Recreational | |
Welcome to the Maltese Falcon Bar & Grill!
The bar is located in the center of the station, and is adjacent to the Kitchen. It is the spawn point and workplace of the Bartender. The bar door and back room all require Bar access. Be careful, as Medical Doctors come here to steal every last drop of the Bar's booze. They will stay there until all of the Pan Galactic Gargle Blasters are completely chugged away.
By default the bar's sign will be chosen randomly, but the bartender can choose whichever one he wants to be displayed by interacting with the sign.
Bar Signs
![]() Aloha Snackbar!
Aloha Snackbar!
![]() Combo Cafe
Combo Cafe
![]() Emergency Rum Party!
Emergency Rum Party!
![]() Honked 'n Loaded
Honked 'n Loaded
![]() Maid Cafe
Maid Cafe
![]() Maltese Falcon
Maltese Falcon
![]() Officer Beersky
Officer Beersky
![]() Old Cock Inn
Old Cock Inn
![]() Robusta Cafe
Robusta Cafe
![]() Scotch Servin' Willys
Scotch Servin' Willys
![]() Slippery Shots
Slippery Shots
![]() The Adminbus
The Adminbus
![]() The Ale Nath
The Ale Nath
![]() The Bark
The Bark
![]() The Cavern
The Cavern
![]() The Coderbus
The Coderbus
![]() The Drunk Carp
The Drunk Carp
![]() The Goose
The Goose
![]() The Greytide
The Greytide
![]() The Harmbaton
The Harmbaton
![]() The Lightbulb
The Lightbulb
![]() The Nest
The Nest
![]() The Net
The Net
![]() The Outer Spess
The Outer Spess
![]() The Shaken
The Shaken
![]() The Singulo
The Singulo
![]() The SyndiCat
The SyndiCat
![]() The Wretched Hive
The Wretched Hive
![]() Vlad's Salad Bar
Vlad's Salad Bar
![]() Little Treats Tea Room
Little Treats Tea Room
![]() Le Café Silencieux
Le Café Silencieux
![]() Maltroach
Maltroach
![]() Rock Bottom
Rock Bottom
![]() The Assembly Line
The Assembly Line
![]() Bargonia
Bargonia
![]() Cult Cove
Cult Cove
![]() Neon Flamingo
Neon Flamingo
![]() Slowdive
Slowdive
Special circumstances will result in one of the following bar signs:
![]()
![]()
The Bar
The bar contains a seating area, a bar and a private backroom for the bartender.
The seating area is shared by both the bar and kitchen, as well as people using it as a shortcut through the station. It has a long table, with a few food items on it.
The bar is rather small, but has enough seating for six people. It has some drink machines, a mixer and some cigars. The bar is located to the south-east of the Atrium.
The backroom is located east of the bar and has a condimaster and a booze storage.
 Locations on Yogstation Locations on Yogstation
| |||||||||
| General | Recreational | Medical | Supply | Science | Engineering | Security | Command | Upkeep | Outside |
