Bar: Difference between revisions
No edit summary |
No edit summary |
||
| Line 2: | Line 2: | ||
'''[[Bartender|For the Guide to the Bartender, click here.]]'''</font> | '''[[Bartender|For the Guide to the Bartender, click here.]]'''</font> | ||
<tabs> | <tabs> | ||
<tab style="width:100%" name=" | <tab style="width:100%" name="AsteroidStation"> | ||
{{Location | {{Location | ||
|headerbgcolor=#92b26d | |headerbgcolor=#92b26d | ||
|headerfontcolor = black | |headerfontcolor = black | ||
|image= | |image=Bar_Asteroid.png | ||
|location=Bar | |location=Bar | ||
|description=Relax and have a drink or two. | |description=Relax and have a drink or two. | ||
|purpose=Host barfights and get drunk. | |purpose=Host barfights and get drunk. | ||
|items= | |items=Spray tan, Booze-O-Mat, fishing gear, piano | ||
|workers=[[Bartender]] | |workers=[[Bartender]] | ||
|access=[[Bartender]] for the bar | |access=[[Bartender]] for the bar | ||
|exits= | |exits=North to [[maintenance|Port Bow Maintenance]], north-west to [[Theatre]], east to [[Kitchen]], south to Central Primary Hallway | ||
|department=Recreational | |department=Recreational | ||
|footerbgcolor=#92b26d | |footerbgcolor=#92b26d | ||
| Line 21: | Line 21: | ||
Welcome to the Maltese Falcon Bar & Grill! | Welcome to the Maltese Falcon Bar & Grill! | ||
The bar is located on the | The bar is located on the western side of the station, and is adjacent to the [[Kitchen]]. It is the spawn point and workplace of Pun Pun the Monkey and the [[Bartender]]. Be careful, as [[Medical Doctor]]s come here to steal every last drop of the Bar's booze. They will stay there until all of the Pan Galactic Gargle Blasters are completely chugged away. | ||
By default the bar's sign will be chosen randomly, but the bartender can choose whichever one | By default the bar's sign will be chosen randomly, but the bartender can choose whichever one they want to be displayed by interacting with the sign. | ||
<div class="toccolours mw-collapsible mw-collapsed" style="width:800px"> | <div class="toccolours mw-collapsible mw-collapsed" style="width:800px"> | ||
| Line 73: | Line 73: | ||
</div> | </div> | ||
The bar features seating areas, a | The bar features seating areas, a theatre, a beach and water, a bar and a private room for the bartender. It has a beach theme; featuring water, sand, palm trees, spray tan and fishing gear. | ||
The | The theatre is located in the north-west area of the bar and gives host to a Bananium Kreb. There is also a variety of instruments for all your performance needs, including a piano. You will find plenty of space to decorate the stage. This is your chance to make your face well-known across the station! | ||
The bar, located to the | The bar, located to the east, contains enough seating for plenty of visitors. You will be greeted by Pun Pun on your arrival, and the bartender if he's not already drunk off the booze. You will need Bar access <s>or just climb over the tables</s> to enter into the main section of the bar. This contains a Booze-O-Mat and all the tools the [[Bartender]] needs to mix and serve drinks. A private room is located just north of the bar, and requires Bar access to enter. This is where [[Cult|suspicious]] [[Changeling|activities]] take place. | ||
</tab> | </tab> | ||
<tab style="width:100%" name=" | <tab style="width:100%" name="BoxStation"> | ||
{{Location | {{Location | ||
|headerbgcolor=#92b26d | |headerbgcolor=#92b26d | ||
|headerfontcolor = black | |headerfontcolor = black | ||
|image= | |image=Bar_box.png | ||
|location=Bar | |location=Bar | ||
|description=Relax and have a drink or two. | |description=Relax and have a drink or two. | ||
|purpose=Host barfights and get drunk. | |purpose=Host barfights and get drunk. | ||
|items= | |items=A [[Piano|piano]], Booze-O-Mat. | ||
|workers=[[Bartender]] | |workers=[[Bartender]] | ||
|access=[[Bartender]] for the bar | |access=[[Bartender]] for the bar | ||
|exits= | |exits=South to Starboard Primary Hallway, north to the [[Dormitory]], north-east to [[maintenance]], east to [[Kitchen]] | ||
|department=Recreational | |department=Recreational | ||
|footerbgcolor=#92b26d | |footerbgcolor=#92b26d | ||
| Line 101: | Line 99: | ||
Welcome to the Maltese Falcon Bar & Grill! | Welcome to the Maltese Falcon Bar & Grill! | ||
The bar is located | The bar is located on the eastern side (starboard corridor) of the station, and is adjacent to the [[Kitchen]]. It is the spawn point and workplace of Pun Pun the Monkey (rip deempisi) and the [[Bartender]]. Be careful, as [[Medical Doctor]]s come here to steal every last drop of the Bar's booze. They will stay there until all of the Pan Galactic Gargle Blasters are completely chugged away. | ||
By default the bar's sign will be chosen randomly, but the bartender can choose whichever one he wants to be displayed by interacting with the sign. | By default the bar's sign will be chosen randomly, but the bartender can choose whichever one he wants to be displayed by interacting with the sign. | ||
| Line 153: | Line 151: | ||
</div> | </div> | ||
The bar features seating areas, a theatre, a bar and a private room for the bartender. | |||
The | The theatre is located in the south-east area of the bar and gives host to the famous Honk Bot. There is also a variety of instruments for all your performance needs, including a piano. You will find plenty of space to decorate the stage. This is your chance to make your face well-known across the station! | ||
The seating | The bar, located to the west, contains enough seating for plenty of visitors. You will be greeted by Pun Pun on your arrival, and the bartender if he's not already drunk off the booze. You will need Bar access <s>or just climb over the tables</s> to enter into the main section of the bar. This contains a Booze-O-Mat and all the tools the [[Bartender]] needs to mix and serve drinks. | ||
The | The private room is located just north of the bar, and requires Bar access to enter. This is where [[Cult|suspicious]] [[Changeling|activities]] take place. As well as that there are two lockers and a clothing vendor. | ||
</tab> | </tab> | ||
<tab style="width:100%" name=" | <tab style="width:100%" name="DonutStation"> | ||
{{Location | {{Location | ||
|headerbgcolor=#92b26d | |headerbgcolor=#92b26d | ||
|headerfontcolor = black | |headerfontcolor = black | ||
|image= | |image=Bar_Donut.png | ||
|location=Bar | |location=Bar | ||
|description=Relax and have a drink or two. | |description=Relax and have a drink or two. | ||
|purpose=Host barfights and get drunk. | |purpose=Host barfights and get drunk. | ||
|items= | |items=Pun Pun, Booze-O-Mat. | ||
|workers=[[Bartender]] | |workers=[[Bartender]] | ||
|access=[[Bartender]] for the bar | |access=[[Bartender]] for the bar | ||
|exits= | |exits=East to [[Kitchen]], west to [[maintenance|Port Quarter (SW) Maintenance]] | ||
|department=Recreational | |department=Recreational | ||
|footerbgcolor=#92b26d | |footerbgcolor=#92b26d | ||
| Line 186: | Line 179: | ||
Welcome to the Maltese Falcon Bar & Grill! | Welcome to the Maltese Falcon Bar & Grill! | ||
The bar is located | The bar is located on the southern side of the station, and is adjacent to the [[Kitchen]]. It is the spawn point and workplace of Pun Pun the Monkey and the [[Bartender]]. Be careful, as [[Medical Doctor]]s come here to steal every last drop of the Bar's booze. They will stay there until all of the Pan Galactic Gargle Blasters are completely chugged away. | ||
By default the bar's sign will be chosen randomly, but the bartender can choose whichever one he wants to be displayed by interacting with the sign. | By default the bar's sign will be chosen randomly, but the bartender can choose whichever one he wants to be displayed by interacting with the sign. | ||
| Line 238: | Line 231: | ||
</div> | </div> | ||
The bar contains enough seating for plenty of visitors. You will be greeted by Pun Pun on your arrival, and the bartender if he's not already drunk off the booze. You will need Bar access <s>or just climb over the tables</s> to enter into the main section of the bar. This contains a Booze-O-Mat and all the tools the [[Bartender]] needs to mix and serve drinks. | |||
A private room is located just west of the bar, and requires Bar access to enter. This is where [[Cult|suspicious]] [[Changeling|activities]] take place. | |||
</tab> | </tab> | ||
<tab style="width:100%" name=" | <tab style="width:100%" name="IceMeta"> | ||
{{Location | {{Location | ||
|headerbgcolor=#92b26d | |headerbgcolor=#92b26d | ||
| Line 365: | Line 244: | ||
|description=Relax and have a drink or two. | |description=Relax and have a drink or two. | ||
|purpose=Host barfights and get drunk. | |purpose=Host barfights and get drunk. | ||
|items=Booze-O-Mat, | |items=Booze-O-Mat, seating, jukebox, Russian revolver | ||
|workers=[[Bartender]] | |workers=[[Bartender]] | ||
|access=[[Bartender]] for the bar | |access=[[Bartender]] for the bar | ||
|exits= | |exits=North to Starboard (E) Primary Hallway, east to the [[Theatre]], south-east to [[Kitchen]], south-west to Service Hallway, west to Central Primary Hallway | ||
|department=Recreational | |department=Recreational | ||
|footerbgcolor=#92b26d | |footerbgcolor=#92b26d | ||
| Line 376: | Line 255: | ||
Welcome to the Maltese Falcon Bar & Grill! | Welcome to the Maltese Falcon Bar & Grill! | ||
The bar is located on the eastern side (starboard corridor) of the station, and is adjacent to the Kitchen. It is the spawn point and workplace of Pun Pun the Monkey | The bar is located on the eastern side (starboard corridor) of the station, and is adjacent to the Kitchen. It is the spawn point and workplace of Pun Pun the Monkey and the [[Bartender]]. The bar door and back room all require Bar access. Be careful, as [[Medical Doctor]]s come here to steal every last drop of the Bar's booze. They will stay there until all of the Pan Galactic Gargle Blasters are completely chugged away. | ||
By default the bar's sign will be chosen randomly, but the bartender can choose whichever one he wants to be displayed by interacting with the sign. | By default the bar's sign will be chosen randomly, but the bartender can choose whichever one he wants to be displayed by interacting with the sign. | ||
| Line 427: | Line 306: | ||
</div> | </div> | ||
</div> | </div> | ||
This bar contains a seating area, a bar and a private backroom for the bartender. | This bar contains a seating area, a bar and a private backroom for the bartender. | ||
The seating area is shared by people waiting on drinks, food and walking to the | The seating area is shared by people waiting on drinks, food and walking to the theatre so expect a variety of characters to be in here. The bar side has six seats and more space to stand if that's not enough for you. There are also tables around the shared area to sit at. | ||
The bar contains | The bar contains a Booze-O-Mat and all the tools the [[Bartender]] needs to mix and serve drinks. | ||
The backroom is where beer kegs are stored and [[Cult|suspicious]] [[Changeling|activities]] take place. There is also a | The backroom is where beer kegs are stored and [[Cult|suspicious]] [[Changeling|activities]] take place. There is also a HoochMaster 2000, a booze storage closet and a clothing vendor. | ||
</tab> | </tab> | ||
| Line 451: | Line 327: | ||
|workers=[[Bartender]] | |workers=[[Bartender]] | ||
|access=[[Bartender]] for the bar | |access=[[Bartender]] for the bar | ||
|exits=South to Starboard Primary Hallway, north to the | |exits=North-east to [[maintenance|Starboard Bow (NE) Maintenance]], South to Starboard (E) Primary Hallway, north to the [[Kitchen]] and [[Hydroponics]] | ||
|department=Recreational | |department=Recreational | ||
|footerbgcolor=#92b26d | |footerbgcolor=#92b26d | ||
| Line 510: | Line 386: | ||
</div> | </div> | ||
</div> | </div> | ||
The bar contains a seating area, a bar and a private backroom for the bartender. | The bar contains a seating area, a bar and a private backroom for the bartender. | ||
The seating area is shared by both the bar and kitchen, | The seating area is shared by both the bar and kitchen; containing two tables and chairs to sit at, as well as a slot machine. | ||
The bar is located to the north of the [[Research Division]]. | The bar is located to the north of the [[Research Division]]. | ||
</tab> | </tab> | ||
</tabs> | </tabs> | ||
Latest revision as of 12:21, 27 June 2024
For the Guide to Drinks, click here.
For the Guide to the Bartender, click here.
| Bar | |
| Relax and have a drink or two. | |
| Purpose: | Host barfights and get drunk. |
| Key items: | Spray tan, Booze-O-Mat, fishing gear, piano |
| Workers: | Bartender |
| Access: | Bartender for the bar |
| Exits: | North to Port Bow Maintenance, north-west to Theatre, east to Kitchen, south to Central Primary Hallway |
| Recreational | |
Welcome to the Maltese Falcon Bar & Grill!
The bar is located on the western side of the station, and is adjacent to the Kitchen. It is the spawn point and workplace of Pun Pun the Monkey and the Bartender. Be careful, as Medical Doctors come here to steal every last drop of the Bar's booze. They will stay there until all of the Pan Galactic Gargle Blasters are completely chugged away.
By default the bar's sign will be chosen randomly, but the bartender can choose whichever one they want to be displayed by interacting with the sign.
Bar Signs
![]() Aloha Snackbar!
Aloha Snackbar!
![]() Combo Cafe
Combo Cafe
![]() Emergency Rum Party!
Emergency Rum Party!
![]() Honked 'n Loaded
Honked 'n Loaded
![]() Maid Cafe
Maid Cafe
![]() Maltese Falcon
Maltese Falcon
![]() Officer Beersky
Officer Beersky
![]() Old Cock Inn
Old Cock Inn
![]() Robusta Cafe
Robusta Cafe
![]() Scotch Servin' Willys
Scotch Servin' Willys
![]() Slippery Shots
Slippery Shots
![]() The Adminbus
The Adminbus
![]() The Ale Nath
The Ale Nath
![]() The Bark
The Bark
![]() The Cavern
The Cavern
![]() The Coderbus
The Coderbus
![]() The Drunk Carp
The Drunk Carp
![]() The Goose
The Goose
![]() The Greytide
The Greytide
![]() The Harmbaton
The Harmbaton
![]() The Lightbulb
The Lightbulb
![]() The Nest
The Nest
![]() The Net
The Net
![]() The Outer Spess
The Outer Spess
![]() The Shaken
The Shaken
![]() The Singulo
The Singulo
![]() The SyndiCat
The SyndiCat
![]() The Wretched Hive
The Wretched Hive
![]() Vlad's Salad Bar
Vlad's Salad Bar
![]() Little Treats Tea Room
Little Treats Tea Room
![]() Le Café Silencieux
Le Café Silencieux
![]() Maltroach
Maltroach
![]() Rock Bottom
Rock Bottom
![]() The Assembly Line
The Assembly Line
![]() Bargonia
Bargonia
![]() Cult Cove
Cult Cove
![]() Neon Flamingo
Neon Flamingo
![]() Slowdive
Slowdive
Special circumstances will result in one of the following bar signs:
![]()
![]()
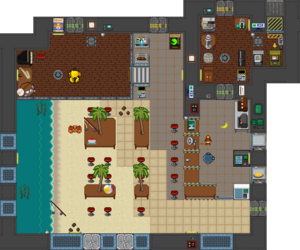
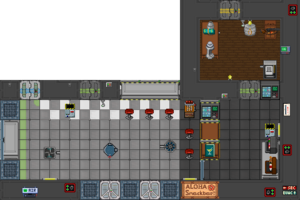
The bar features seating areas, a theatre, a beach and water, a bar and a private room for the bartender. It has a beach theme; featuring water, sand, palm trees, spray tan and fishing gear.
The theatre is located in the north-west area of the bar and gives host to a Bananium Kreb. There is also a variety of instruments for all your performance needs, including a piano. You will find plenty of space to decorate the stage. This is your chance to make your face well-known across the station!
The bar, located to the east, contains enough seating for plenty of visitors. You will be greeted by Pun Pun on your arrival, and the bartender if he's not already drunk off the booze. You will need Bar access or just climb over the tables to enter into the main section of the bar. This contains a Booze-O-Mat and all the tools the Bartender needs to mix and serve drinks. A private room is located just north of the bar, and requires Bar access to enter. This is where suspicious activities take place.
| Bar | |
| Relax and have a drink or two. | |
| Purpose: | Host barfights and get drunk. |
| Key items: | A piano, Booze-O-Mat. |
| Workers: | Bartender |
| Access: | Bartender for the bar |
| Exits: | South to Starboard Primary Hallway, north to the Dormitory, north-east to maintenance, east to Kitchen |
| Recreational | |
Welcome to the Maltese Falcon Bar & Grill!
The bar is located on the eastern side (starboard corridor) of the station, and is adjacent to the Kitchen. It is the spawn point and workplace of Pun Pun the Monkey (rip deempisi) and the Bartender. Be careful, as Medical Doctors come here to steal every last drop of the Bar's booze. They will stay there until all of the Pan Galactic Gargle Blasters are completely chugged away.
By default the bar's sign will be chosen randomly, but the bartender can choose whichever one he wants to be displayed by interacting with the sign.
Bar Signs
![]() Aloha Snackbar!
Aloha Snackbar!
![]() Combo Cafe
Combo Cafe
![]() Emergency Rum Party!
Emergency Rum Party!
![]() Honked 'n Loaded
Honked 'n Loaded
![]() Maid Cafe
Maid Cafe
![]() Maltese Falcon
Maltese Falcon
![]() Officer Beersky
Officer Beersky
![]() Old Cock Inn
Old Cock Inn
![]() Robusta Cafe
Robusta Cafe
![]() Scotch Servin' Willys
Scotch Servin' Willys
![]() Slippery Shots
Slippery Shots
![]() The Adminbus
The Adminbus
![]() The Ale Nath
The Ale Nath
![]() The Bark
The Bark
![]() The Cavern
The Cavern
![]() The Coderbus
The Coderbus
![]() The Drunk Carp
The Drunk Carp
![]() The Goose
The Goose
![]() The Greytide
The Greytide
![]() The Harmbaton
The Harmbaton
![]() The Lightbulb
The Lightbulb
![]() The Nest
The Nest
![]() The Net
The Net
![]() The Outer Spess
The Outer Spess
![]() The Shaken
The Shaken
![]() The Singulo
The Singulo
![]() The SyndiCat
The SyndiCat
![]() The Wretched Hive
The Wretched Hive
![]() Vlad's Salad Bar
Vlad's Salad Bar
![]() Little Treats Tea Room
Little Treats Tea Room
![]() Le Café Silencieux
Le Café Silencieux
![]() Maltroach
Maltroach
![]() Rock Bottom
Rock Bottom
![]() The Assembly Line
The Assembly Line
![]() Bargonia
Bargonia
![]() Cult Cove
Cult Cove
![]() Neon Flamingo
Neon Flamingo
![]() Slowdive
Slowdive
Special circumstances will result in one of the following bar signs:
![]()
![]()
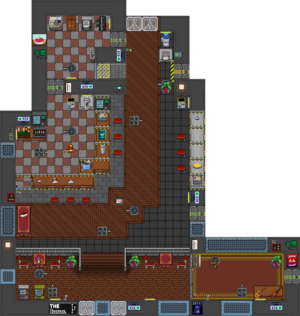
The bar features seating areas, a theatre, a bar and a private room for the bartender.
The theatre is located in the south-east area of the bar and gives host to the famous Honk Bot. There is also a variety of instruments for all your performance needs, including a piano. You will find plenty of space to decorate the stage. This is your chance to make your face well-known across the station!
The bar, located to the west, contains enough seating for plenty of visitors. You will be greeted by Pun Pun on your arrival, and the bartender if he's not already drunk off the booze. You will need Bar access or just climb over the tables to enter into the main section of the bar. This contains a Booze-O-Mat and all the tools the Bartender needs to mix and serve drinks.
The private room is located just north of the bar, and requires Bar access to enter. This is where suspicious activities take place. As well as that there are two lockers and a clothing vendor.
| Bar | |
| Relax and have a drink or two. | |
| Purpose: | Host barfights and get drunk. |
| Key items: | Pun Pun, Booze-O-Mat. |
| Workers: | Bartender |
| Access: | Bartender for the bar |
| Exits: | East to Kitchen, west to Port Quarter (SW) Maintenance |
| Recreational | |
Welcome to the Maltese Falcon Bar & Grill!
The bar is located on the southern side of the station, and is adjacent to the Kitchen. It is the spawn point and workplace of Pun Pun the Monkey and the Bartender. Be careful, as Medical Doctors come here to steal every last drop of the Bar's booze. They will stay there until all of the Pan Galactic Gargle Blasters are completely chugged away.
By default the bar's sign will be chosen randomly, but the bartender can choose whichever one he wants to be displayed by interacting with the sign.
Bar Signs
![]() Aloha Snackbar!
Aloha Snackbar!
![]() Combo Cafe
Combo Cafe
![]() Emergency Rum Party!
Emergency Rum Party!
![]() Honked 'n Loaded
Honked 'n Loaded
![]() Maid Cafe
Maid Cafe
![]() Maltese Falcon
Maltese Falcon
![]() Officer Beersky
Officer Beersky
![]() Old Cock Inn
Old Cock Inn
![]() Robusta Cafe
Robusta Cafe
![]() Scotch Servin' Willys
Scotch Servin' Willys
![]() Slippery Shots
Slippery Shots
![]() The Adminbus
The Adminbus
![]() The Ale Nath
The Ale Nath
![]() The Bark
The Bark
![]() The Cavern
The Cavern
![]() The Coderbus
The Coderbus
![]() The Drunk Carp
The Drunk Carp
![]() The Goose
The Goose
![]() The Greytide
The Greytide
![]() The Harmbaton
The Harmbaton
![]() The Lightbulb
The Lightbulb
![]() The Nest
The Nest
![]() The Net
The Net
![]() The Outer Spess
The Outer Spess
![]() The Shaken
The Shaken
![]() The Singulo
The Singulo
![]() The SyndiCat
The SyndiCat
![]() The Wretched Hive
The Wretched Hive
![]() Vlad's Salad Bar
Vlad's Salad Bar
![]() Little Treats Tea Room
Little Treats Tea Room
![]() Le Café Silencieux
Le Café Silencieux
![]() Maltroach
Maltroach
![]() Rock Bottom
Rock Bottom
![]() The Assembly Line
The Assembly Line
![]() Bargonia
Bargonia
![]() Cult Cove
Cult Cove
![]() Neon Flamingo
Neon Flamingo
![]() Slowdive
Slowdive
Special circumstances will result in one of the following bar signs:
![]()
![]()
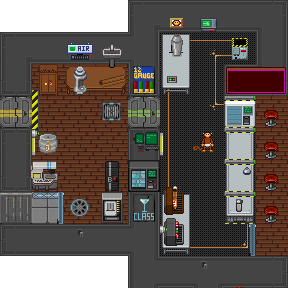
The bar contains enough seating for plenty of visitors. You will be greeted by Pun Pun on your arrival, and the bartender if he's not already drunk off the booze. You will need Bar access or just climb over the tables to enter into the main section of the bar. This contains a Booze-O-Mat and all the tools the Bartender needs to mix and serve drinks.
A private room is located just west of the bar, and requires Bar access to enter. This is where suspicious activities take place.
| Bar | |
| Relax and have a drink or two. | |
| Purpose: | Host barfights and get drunk. |
| Key items: | Booze-O-Mat, seating, jukebox, Russian revolver |
| Workers: | Bartender |
| Access: | Bartender for the bar |
| Exits: | North to Starboard (E) Primary Hallway, east to the Theatre, south-east to Kitchen, south-west to Service Hallway, west to Central Primary Hallway |
| Recreational | |
Welcome to the Maltese Falcon Bar & Grill!
The bar is located on the eastern side (starboard corridor) of the station, and is adjacent to the Kitchen. It is the spawn point and workplace of Pun Pun the Monkey and the Bartender. The bar door and back room all require Bar access. Be careful, as Medical Doctors come here to steal every last drop of the Bar's booze. They will stay there until all of the Pan Galactic Gargle Blasters are completely chugged away.
By default the bar's sign will be chosen randomly, but the bartender can choose whichever one he wants to be displayed by interacting with the sign.
Bar Signs
![]() Aloha Snackbar!
Aloha Snackbar!
![]() Combo Cafe
Combo Cafe
![]() Emergency Rum Party!
Emergency Rum Party!
![]() Honked 'n Loaded
Honked 'n Loaded
![]() Maid Cafe
Maid Cafe
![]() Maltese Falcon
Maltese Falcon
![]() Officer Beersky
Officer Beersky
![]() Old Cock Inn
Old Cock Inn
![]() Robusta Cafe
Robusta Cafe
![]() Scotch Servin' Willys
Scotch Servin' Willys
![]() Slippery Shots
Slippery Shots
![]() The Adminbus
The Adminbus
![]() The Ale Nath
The Ale Nath
![]() The Bark
The Bark
![]() The Cavern
The Cavern
![]() The Coderbus
The Coderbus
![]() The Drunk Carp
The Drunk Carp
![]() The Goose
The Goose
![]() The Greytide
The Greytide
![]() The Harmbaton
The Harmbaton
![]() The Lightbulb
The Lightbulb
![]() The Nest
The Nest
![]() The Net
The Net
![]() The Outer Spess
The Outer Spess
![]() The Shaken
The Shaken
![]() The Singulo
The Singulo
![]() The SyndiCat
The SyndiCat
![]() The Wretched Hive
The Wretched Hive
![]() Vlad's Salad Bar
Vlad's Salad Bar
![]() Little Treats Tea Room
Little Treats Tea Room
![]() Le Café Silencieux
Le Café Silencieux
![]() Maltroach
Maltroach
![]() Rock Bottom
Rock Bottom
![]() The Assembly Line
The Assembly Line
![]() Bargonia
Bargonia
![]() Cult Cove
Cult Cove
![]() Neon Flamingo
Neon Flamingo
![]() Slowdive
Slowdive
Special circumstances will result in one of the following bar signs:
![]()
![]()
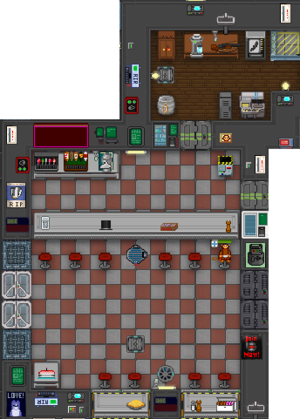
This bar contains a seating area, a bar and a private backroom for the bartender.
The seating area is shared by people waiting on drinks, food and walking to the theatre so expect a variety of characters to be in here. The bar side has six seats and more space to stand if that's not enough for you. There are also tables around the shared area to sit at.
The bar contains a Booze-O-Mat and all the tools the Bartender needs to mix and serve drinks.
The backroom is where beer kegs are stored and suspicious activities take place. There is also a HoochMaster 2000, a booze storage closet and a clothing vendor.
| Bar | |
| Relax and have a drink or two. | |
| Purpose: | Host barfights and get drunk. |
| Key items: | Slot machine, a wide assortment of alcoholic drinks |
| Workers: | Bartender |
| Access: | Bartender for the bar |
| Exits: | North-east to Starboard Bow (NE) Maintenance, South to Starboard (E) Primary Hallway, north to the Kitchen and Hydroponics |
| Recreational | |
Welcome to the Maltese Falcon Bar & Grill!
The bar is located to the east of the station, and is adjacent to the Kitchen. It is the spawn point and workplace of the Bartender. The bar door and back room all require Bar access. Be careful, as Medical Doctors come here to steal every last drop of the Bar's booze. They will stay there until all of the Pan Galactic Gargle Blasters are completely chugged away.
By default the bar's sign will be chosen randomly, but the bartender can choose whichever one he wants to be displayed by interacting with the sign.
Bar Signs
![]() Aloha Snackbar!
Aloha Snackbar!
![]() Combo Cafe
Combo Cafe
![]() Emergency Rum Party!
Emergency Rum Party!
![]() Honked 'n Loaded
Honked 'n Loaded
![]() Maid Cafe
Maid Cafe
![]() Maltese Falcon
Maltese Falcon
![]() Officer Beersky
Officer Beersky
![]() Old Cock Inn
Old Cock Inn
![]() Robusta Cafe
Robusta Cafe
![]() Scotch Servin' Willys
Scotch Servin' Willys
![]() Slippery Shots
Slippery Shots
![]() The Adminbus
The Adminbus
![]() The Ale Nath
The Ale Nath
![]() The Bark
The Bark
![]() The Cavern
The Cavern
![]() The Coderbus
The Coderbus
![]() The Drunk Carp
The Drunk Carp
![]() The Goose
The Goose
![]() The Greytide
The Greytide
![]() The Harmbaton
The Harmbaton
![]() The Lightbulb
The Lightbulb
![]() The Nest
The Nest
![]() The Net
The Net
![]() The Outer Spess
The Outer Spess
![]() The Shaken
The Shaken
![]() The Singulo
The Singulo
![]() The SyndiCat
The SyndiCat
![]() The Wretched Hive
The Wretched Hive
![]() Vlad's Salad Bar
Vlad's Salad Bar
![]() Little Treats Tea Room
Little Treats Tea Room
![]() Le Café Silencieux
Le Café Silencieux
![]() Maltroach
Maltroach
![]() Rock Bottom
Rock Bottom
![]() The Assembly Line
The Assembly Line
![]() Bargonia
Bargonia
![]() Cult Cove
Cult Cove
![]() Neon Flamingo
Neon Flamingo
![]() Slowdive
Slowdive
Special circumstances will result in one of the following bar signs:
![]()
![]()
The bar contains a seating area, a bar and a private backroom for the bartender.
The seating area is shared by both the bar and kitchen; containing two tables and chairs to sit at, as well as a slot machine.
The bar is located to the north of the Research Division.
 Locations on Yogstation Locations on Yogstation
| |||||||||
| General | Recreational | Medical | Supply | Science | Engineering | Security | Command | Upkeep | Outside |
