Guide to toxins: Difference between revisions
imported>Kingofkosmos (Removed the success.png cos no one has added it.) |
m (I /think/ I fixed a typo) |
||
| (30 intermediate revisions by 15 users not shown) | |||
| Line 1: | Line 1: | ||
Toxins is a | ''Credit to Yacabo111 for writing this guide!'' | ||
=Introduction= | |||
Welcome to a guide to toxins, this is not a guide made by a professional but by someone willing to remake a years out of date guide. If you do not know, Toxins is the place in science that makes bombs and or maxcaps by using a burn chamber to heat [[Plasma]] and or [[Guide_to_Atmospherics#Tritium|Tritium]]. In this guide, we will be making a [[Guide_to_Atmospherics#Tritium|Tritium]] maxcap. This guide will be in [[Boxstation|YogBox]], so some intuition may be needed on other stations. | |||
=Your tools= | |||
The default toxins setup, while usable, is ineffective in making what we want and as such will require some rearranging. To do this, we will need: | |||
*a [[Wrench]]: to fix mistakes and secure canisters<br> | |||
*an [[Analyzer]]: to check the gases in pipes and canisters<br> | |||
*a Rapid Pipe Dispenser (RPD): to make new pipes. You can change what pipes it makes by clicking on it while it’s in your active hand<br> | |||
All of these should already be in toxins, so there is no need to hassle someone else for them. | |||
=Adjusting Toxins= | |||
[[File:toxins1.png|300px|thumb]][[File:toxins2.png|300px|thumb|Play spot the difference basically.]] | |||
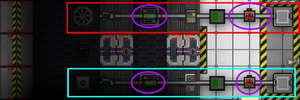
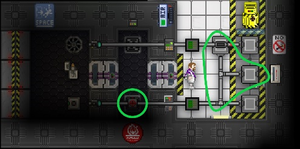
Part of the burn chamber is an <font color="blue">input</font> and <font color="red">output</font> pipe that give and take out gasses of the burn chamber respectively, each with their own issues. | |||
====Output==== | |||
The <font color="red">output pipe</font> is simple to adjust, all you must do is replace the <font color="purple">manual valve</font> and <font color="purple">gas pump</font> with a <font color="forestgreen">volume pump</font> and <font color="forestgreen">pipe</font>. Ensure the <font color="forestgreen">volume pump</font> is on, pumping to the east, and on max | |||
====Input==== | |||
The <font color="blue">input pipe</font> is a bit trickier - first, the <font color="purple">manual valve</font> must be replaced with a <font color="forestgreen">manifold pipe</font> facing west-north-east and directly north of that, another <font color="forestgreen">manifold pipe</font> north-east-south, attached to the <font color="forestgreen">manifold pipe</font> should be two connectors on the north and east side. Finally, replace the southern <font color="purple">gas pump</font> with a <font color="forestgreen">manual valve</font> and made sure it is closed. | |||
Essentially, this setup allows much of the gases to go in all at once for a better burn and while the output dumps as much as it can into the [[Guide_to_Atmospherics#Tritium|Tritium]] [[canister]]. | |||
====Mixing==== | |||
Next, we will fix the gas mixer. | |||
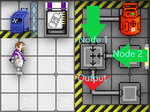
The only thing needed to do is to replace the pipe under the gas flow meter with a gas mixer that connects to the pipes next to it and faces south. Open the mixer’s menu and set Node 1 to 4% and Node 2 to 96%, set the output pressure to the max, and turn the mixer ON. It may be worth taking the southern connector and attaching it directly to the mixer output rather than having a pipe separating the two, but it is not necessary. | |||
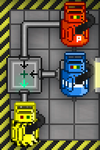
== | Once the mixer is setup grab a [[plasma]] [[canister]], wrench it on to the northmost connector, grab an [[Oxygen]] [[canister]], wrench it onto the middle connector, grab an empty [[canister]] and of course, wrench it onto the southmost connecter. | ||
{| class="wikitable" | |||
|[[File:toxins3.png|100px|thumb|left]] | |||
|[[File:toxins4.png|150px|thumb|left]] | |||
|} | |||
''Fun Fact: You can relabel the colour and name of the [[canister]] by pressing the ‘relabel’ function in their menu, this means that you can keep track of which [[canister]] has what gas and also that any [[canister]] can have any gas.'' | |||
=Mixing Gases= | |||
Assuming you connected all the canisters in the right positions, you are now putting a mix of gasses into the caution [[canister]]. The actual mix is 4% [[Plasma]] and 96% [[Oxygen]], and it is impossible to explain why and what this will do as the atmospherics code is based on nearly two decades of spaghetti and duct tape. | |||
The | None the less, we will need three full canisters of this mix which will also require more [[Oxygen]] canisters as well. The actual max limit of what a [[canister]] can handle is infinite, but for our intents, they can only go up to 4500kPa; it is not necessary to reach this limit but as close as you can. Do note that you can use empty oxygen canisters and fill them with a mix as well. | ||
[[File:Toxins5.png|300px|thumb]] | |||
Once | Once three mix canisters have been filled, grab an empty [[canister]] and set it to the end of the output pipe, it’s also best to relabel it to a [[Guide_to_Atmospherics#Tritium|Tritium]] [[canister]], though it is not necessary. Once the [[Guide_to_Atmospherics#Tritium|Tritium]] [[canister]] is in place, check to make sure that the southern manual valve is closed and wrench the mix canisters on the input pipe’s connectors. | ||
Now we will prep the actual chamber. | |||
First, we will depressurize the chamber by pressing the blast door button, waiting a few seconds, and closing them again. Then press the <font color="magenta">lighter button</font> next to the door. | |||
Go ahead and press the <font color="blue">blast door button</font> once more, '''don't forget to close it again.''' | |||
=Making [[Guide_to_Atmospherics#Tritium|Tritium]]= | |||
[[File:Toxins6.png|125px|right|thumb|Expand this.]] | |||
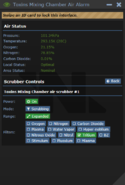
Now’s the fun and relatively automatic part, making and heating the [[Guide_to_Atmospherics#Tritium|Tritium]]. Go to the [[Air Alarm]] by the burn chamber’s airlock doors, access its menu, go into scrubbers, and set the one and the only scrubber to ON, expanded, turn on [[Guide_to_Atmospherics#Tritium|Tritium]], and turn off [[Guide_to_Atmospherics#CO2|Carbon Dioxide]]. This will set the scrubber to ONLY scrub out [[Guide_to_Atmospherics#Tritium|Tritium]], which is what we want. Once everything is set all that’s needed is it to open the manual valve and watch the gases burn. | |||
''If you’re not curious about what’s happening, skip this paragraph.''<br>For those who remain, it is worth noting that as in real life, most things require [[Oxygen]] to explode and burn. As you might imagine [[Plasma]] is no different, but what is interesting to note is that the plasma burning is creating H3 or [[Guide_to_Atmospherics#Tritium|Tritium]], which is great for fusion energy both in the game and in real life. Once the [[Guide_to_Atmospherics#Tritium|Tritium]] is formed, the scrubber is automatically and selectively siphoning it out and into the output pipe; and since the [[Guide_to_Atmospherics#Tritium|Tritium]] was made by burning [[Plasma]], it’s already hot.<br> | |||
{| class="wikitable" | |||
|[[File:Toxins7.png|250px|left]] | |||
|[[File:Toxins8.png|250px|left]] | |||
|} | |||
=Making the Bomb= | |||
Once this burn is completed, you should be able to scan the [[Guide_to_Atmospherics#Tritium|Tritium]] [[canister]] and get ~22mols or ~2200kPa (Some of that may be [[Guide_to_Atmospherics#Water_vapour|water vapour]]). This is enough to make a few bombs. | |||
To make the bomb we’ll be taking the heated [[Guide_to_Atmospherics#Tritium|Tritium]] and some [[Oxygen]], putting them both in their individual tanks, and combining them in a setup that will combine the two on our command. | |||
First, take an [[oxygen tank]] from the tank dispenser and go to your likely last full [[Oxygen]] [[canister]]. Take the [[oxygen tank]] and put it in the [[canister]], open the canisters menu, set the pressure to the max, open the valve, wait for the [[oxygen tank]] to fill, close the valve, and eject your now full [[oxygen tank]]. | |||
Next, take a [[plasma tank]] and fill it up with [[Guide_to_Atmospherics#Tritium|Tritium]] just like you did with the [[oxygen tank]], and yes, we do want the [[Plasma]] that is already in the [[Atmospherics items#Plasma_tank|plasma tank]]. | |||
Then take two remote signaling devices and set them both to the same frequency. '''Do NOT set them to the default frequency or someone with another remote signaling device could set your bomb off early.''' | |||
Now that we have everything we need, we will make the bomb: | |||
#Take a tank transfer valve, there should be some on the table in toxins<br> | |||
#Add the [[oxygen tank]] and [[Plasma]]/[[Guide_to_Atmospherics#Tritium|Tritium]] tank to the tank transfer valve<br> | |||
#At this point, it is a bomb, be careful not to set it off or you will explode.<br> | |||
#Screwdriver one of the remote signaling devices, it should say that it’s ready to be attached<br> | |||
#Attach the device to the tank transfer valve/bomb so that you can detonate it on your signal. Keep the other one on you. | |||
=Explosions= | |||
[[File:Toxins9.png|225px|right|thumb]] | |||
Congrats, you now have a bomb you can set off at any moment now. | |||
'''It’s best to say this now, do NOT blow up random parts of the station.''' If you want to blow something up, be it because you are a [[Traitor]], there is a [[Blob]], you want to invade [[Clockwork Cult|Reebe]], or some other reason. [[Adminhelp]] an admin before you detonate your bomb to make sure you have permission to do so, else you will be banned. | |||
Obviously, the bomb testing site is an exception to this rule which we will be using in this guide. | |||
Go over to the eastern room launch room that gives you a good view into space. In here you will launch, detonate, and scan the bomb. | |||
All that’s needed it to place the bomb in the <font color="magenta">mass driver</font>, press the <font color="red">launch button</font>, check the <font color="cyan">camera</font> to see if the bomb is clear to explode, and then send the signal to detonate it. | |||
The tachyon-doppler array will automatically scan the explosion down and give some points to research. If you check back at the testing site you should see it is only barely there now, admire your new found work and try not to think about blowing up the rest of the station. | |||
=So what now?= | |||
Weeeelllll… not much actually. The note about how you shouldn’t blow anything up without ahelping is probably the most important thing in the guide, that’s because the devastation you can cause with these bombs is massive. You might be able to hand one off to the miners so they have a bit easier time mining, but really, unless you have a bomb target, there isn’t much to do. | |||
= | |||
Latest revision as of 01:40, 21 November 2021
Credit to Yacabo111 for writing this guide!
Introduction
Welcome to a guide to toxins, this is not a guide made by a professional but by someone willing to remake a years out of date guide. If you do not know, Toxins is the place in science that makes bombs and or maxcaps by using a burn chamber to heat Plasma and or Tritium. In this guide, we will be making a Tritium maxcap. This guide will be in YogBox, so some intuition may be needed on other stations.
Your tools
The default toxins setup, while usable, is ineffective in making what we want and as such will require some rearranging. To do this, we will need:
- a Wrench: to fix mistakes and secure canisters
- an Analyzer: to check the gases in pipes and canisters
- a Rapid Pipe Dispenser (RPD): to make new pipes. You can change what pipes it makes by clicking on it while it’s in your active hand
All of these should already be in toxins, so there is no need to hassle someone else for them.
Adjusting Toxins
Part of the burn chamber is an input and output pipe that give and take out gasses of the burn chamber respectively, each with their own issues.
Output
The output pipe is simple to adjust, all you must do is replace the manual valve and gas pump with a volume pump and pipe. Ensure the volume pump is on, pumping to the east, and on max
Input
The input pipe is a bit trickier - first, the manual valve must be replaced with a manifold pipe facing west-north-east and directly north of that, another manifold pipe north-east-south, attached to the manifold pipe should be two connectors on the north and east side. Finally, replace the southern gas pump with a manual valve and made sure it is closed. Essentially, this setup allows much of the gases to go in all at once for a better burn and while the output dumps as much as it can into the Tritium canister.
Mixing
Next, we will fix the gas mixer.
The only thing needed to do is to replace the pipe under the gas flow meter with a gas mixer that connects to the pipes next to it and faces south. Open the mixer’s menu and set Node 1 to 4% and Node 2 to 96%, set the output pressure to the max, and turn the mixer ON. It may be worth taking the southern connector and attaching it directly to the mixer output rather than having a pipe separating the two, but it is not necessary.
Once the mixer is setup grab a plasma canister, wrench it on to the northmost connector, grab an Oxygen canister, wrench it onto the middle connector, grab an empty canister and of course, wrench it onto the southmost connecter.
Fun Fact: You can relabel the colour and name of the canister by pressing the ‘relabel’ function in their menu, this means that you can keep track of which canister has what gas and also that any canister can have any gas.
Mixing Gases
Assuming you connected all the canisters in the right positions, you are now putting a mix of gasses into the caution canister. The actual mix is 4% Plasma and 96% Oxygen, and it is impossible to explain why and what this will do as the atmospherics code is based on nearly two decades of spaghetti and duct tape.
None the less, we will need three full canisters of this mix which will also require more Oxygen canisters as well. The actual max limit of what a canister can handle is infinite, but for our intents, they can only go up to 4500kPa; it is not necessary to reach this limit but as close as you can. Do note that you can use empty oxygen canisters and fill them with a mix as well.
Once three mix canisters have been filled, grab an empty canister and set it to the end of the output pipe, it’s also best to relabel it to a Tritium canister, though it is not necessary. Once the Tritium canister is in place, check to make sure that the southern manual valve is closed and wrench the mix canisters on the input pipe’s connectors.
Now we will prep the actual chamber. First, we will depressurize the chamber by pressing the blast door button, waiting a few seconds, and closing them again. Then press the lighter button next to the door. Go ahead and press the blast door button once more, don't forget to close it again.
Making Tritium
Now’s the fun and relatively automatic part, making and heating the Tritium. Go to the Air Alarm by the burn chamber’s airlock doors, access its menu, go into scrubbers, and set the one and the only scrubber to ON, expanded, turn on Tritium, and turn off Carbon Dioxide. This will set the scrubber to ONLY scrub out Tritium, which is what we want. Once everything is set all that’s needed is it to open the manual valve and watch the gases burn.
If you’re not curious about what’s happening, skip this paragraph.
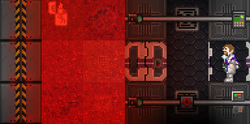
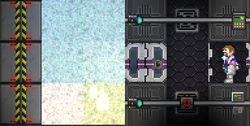
For those who remain, it is worth noting that as in real life, most things require Oxygen to explode and burn. As you might imagine Plasma is no different, but what is interesting to note is that the plasma burning is creating H3 or Tritium, which is great for fusion energy both in the game and in real life. Once the Tritium is formed, the scrubber is automatically and selectively siphoning it out and into the output pipe; and since the Tritium was made by burning Plasma, it’s already hot.
Making the Bomb
Once this burn is completed, you should be able to scan the Tritium canister and get ~22mols or ~2200kPa (Some of that may be water vapour). This is enough to make a few bombs.
To make the bomb we’ll be taking the heated Tritium and some Oxygen, putting them both in their individual tanks, and combining them in a setup that will combine the two on our command.
First, take an oxygen tank from the tank dispenser and go to your likely last full Oxygen canister. Take the oxygen tank and put it in the canister, open the canisters menu, set the pressure to the max, open the valve, wait for the oxygen tank to fill, close the valve, and eject your now full oxygen tank.
Next, take a plasma tank and fill it up with Tritium just like you did with the oxygen tank, and yes, we do want the Plasma that is already in the plasma tank.
Then take two remote signaling devices and set them both to the same frequency. Do NOT set them to the default frequency or someone with another remote signaling device could set your bomb off early.
Now that we have everything we need, we will make the bomb:
- Take a tank transfer valve, there should be some on the table in toxins
- Add the oxygen tank and Plasma/Tritium tank to the tank transfer valve
- At this point, it is a bomb, be careful not to set it off or you will explode.
- Screwdriver one of the remote signaling devices, it should say that it’s ready to be attached
- Attach the device to the tank transfer valve/bomb so that you can detonate it on your signal. Keep the other one on you.
Explosions
Congrats, you now have a bomb you can set off at any moment now.
It’s best to say this now, do NOT blow up random parts of the station. If you want to blow something up, be it because you are a Traitor, there is a Blob, you want to invade Reebe, or some other reason. Adminhelp an admin before you detonate your bomb to make sure you have permission to do so, else you will be banned.
Obviously, the bomb testing site is an exception to this rule which we will be using in this guide.
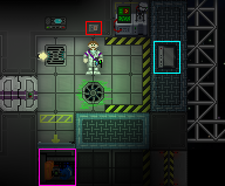
Go over to the eastern room launch room that gives you a good view into space. In here you will launch, detonate, and scan the bomb.
All that’s needed it to place the bomb in the mass driver, press the launch button, check the camera to see if the bomb is clear to explode, and then send the signal to detonate it.
The tachyon-doppler array will automatically scan the explosion down and give some points to research. If you check back at the testing site you should see it is only barely there now, admire your new found work and try not to think about blowing up the rest of the station.
So what now?
Weeeelllll… not much actually. The note about how you shouldn’t blow anything up without ahelping is probably the most important thing in the guide, that’s because the devastation you can cause with these bombs is massive. You might be able to hand one off to the miners so they have a bit easier time mining, but really, unless you have a bomb target, there isn’t much to do.
