Guide to mapping: Difference between revisions
m (→Access) |
|||
| Line 226: | Line 226: | ||
☑ Areas are not too empty.<br> | ☑ Areas are not too empty.<br> | ||
☑ Disposals is connected and works. | ☑ Disposals is connected and works. | ||
☑ All station rooms have gravity. | |||
'''Checking tools:'''<br> | '''Checking tools:'''<br> | ||
Revision as of 20:10, 13 February 2020
Other related guides: Understanding SS13 code, SS13 for experienced programmers and Map Merger.
If there are any errors, questions or requests then feel free to ask in #development-public here.
Downloading and Opening Maps
First, you need to get yourself a copy of all the files for editing. To do this, go here, click "Clone or download" and click "Download ZIP". You won't be able to submit your changes to GitHub, but that's complicated and something you can get round to later. Once the .zip downloads, extract it wherever.
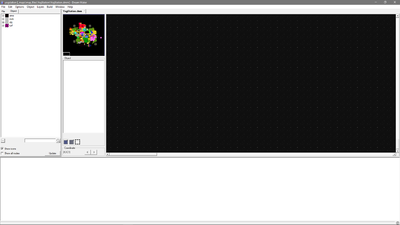
So now you have your folder with the latest code in, and a zip backup to go back to if you break everything. In the master folder (Yogstation-TG), you'll see a file named "yogstation.dme". Double-click this and it should open with Dream Maker, a program that'll be in your BYOND folder. If it doesn't open with Dream Maker, then set it as the default program for opening .dme files. When you open it, you'll see two tabs on the left: file, and object. In the file tab, open _maps, then map_files. This will give you a list of map folder. For this guide we are going to use Boxstation, so open the "YogStation" folder and then open YogStation.dmm. It will take a little while to load, but once it's done you'll then get something looking a bit like the image on the right.
Getting Used to Dream Maker
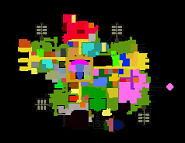
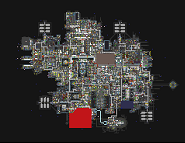
Switch from the files tab to the objects tab, and you'll see "area", "mob", "obj", and "turf". These are the four primary 'layers' that you can see in the editor. It is recommended that you edit with the area layer toggled off, just remember to toggle it back on and check the areas are still correct after finishing your edits. To toggle the area visibility off use the layers dropdown at the top (near file, edit, etc), click "Only Show Selectable Layers", and then click "Area". You will notice that the minimap has changed from blocks of colors to more detailed shapes, as shown on the images on the left.
Some areas, such as the bar and engine on Boxstation, will still be a block of color on your minimap. This is due to them being randomized when the map is used, so them parts of the map are in different files and should not be edited in YogStation.dmm.
I'd advise going into the downloaded Yogstation-TG folder, locating Yogstation.dmm and copying it elsewhere so that you have a clean copy of the map whenever you need one.
Go to the "Options" tab and click "Click Behavior...", then make sure "Click to insert instance" is selected. This will make sure you place objects on top of current ones when you're editing, instead of replacing them. You can Ctrl+Click if you need to replace items in the future. You can change how much of the map you can see at a time by going to "Options" and then "Zoom".
Underneath the minimap you should see this: ![]() . These are three buttons that will determine how your mouse works when editing maps. The first option (add mode) is used to place objects freely: there are no restrictions so you can click and drag to place objects wherever the mouse goes, and objects are placed instantly. The second (fill mode) is what I would recommend using as your default option: it works the same way as the first one, except you have to drag the mouse to select an area to fill with the object, and only after selecting are the objects placed. The third (select mode) is useful for selecting an area (for example, if you want to copy it), as it doesn't allow objects to be placed.
. These are three buttons that will determine how your mouse works when editing maps. The first option (add mode) is used to place objects freely: there are no restrictions so you can click and drag to place objects wherever the mouse goes, and objects are placed instantly. The second (fill mode) is what I would recommend using as your default option: it works the same way as the first one, except you have to drag the mouse to select an area to fill with the object, and only after selecting are the objects placed. The third (select mode) is useful for selecting an area (for example, if you want to copy it), as it doesn't allow objects to be placed.
You can move around the map in a few different ways. You can click (or click and drag) on the minimap to quickly move to an area. You can use the scrollbars on the big map to move around. Try out both methods and see which one suits you best, practice moving to Cargo Bay on the map.
You can have multiple maps open at once - this will allow you to use a different map as a reference, for inspiration, to find things (such as objects) or to copy and paste parts of the map over to yours.
To add anything onto the map, make sure you are on the object tab then click through until you find something you want to place. Then simply select it, and click on the map. Some things (rarely) won't have map sprites, so for now choose one that has one. There are three ways to search for an object:
- Manually click through the object tab until you find it. This method can be very time-consuming.
- Use the search bar underneath the object tab to search for the object you want. This method is good, but can provide multiple results for the same object and may not even provide it at all
- Searching "air alarm" brings up 0 results, as the object is named "airalarm".
- Searching "airalarm" will bring up multiple results, such as electronics and the actual alarm. Keep pressing the search button until you find what you want.
- Locate the object on the current map, then right-click on it to view the item path.
- You can select "Make Active Object" to instantly select that object.
Click around and experiment with all the buttons until you get comfortable with the interface. Then you are ready to move onto the next stage.
Creating a Map: Basics
This guide was originally written by Meta for TG-Station. It has been adapted for YogStation by Ktlwjec. It is written for those with little to no idea of how to use the map-maker.
Begin by creating a new dmm file. To do this, go to "File" then "New". Make sure the Type is "Map File (.dmm)". You can name your file whatever you want to. Press "OK". You'll then be greeted with a map size window. Usually we would make the map hundreds on tiles big, but for now we just want a small map to practice on. Set the x and y values to 30 each, leave the z value on its default.
Creating a Room: Basic Guide
Room Basics
In the Object tab, go to the turf option. "Closed" turfs are walls and "Open" turfs are floors. Go to Turf->Open->Floor then click on Plasteel (not the dropdown menu on it). Many turfs, such as this one, will start with the right make-up and pressure of air on them, which is how you'll want it. Place the floor onto the map in a large square. Next, go to Turf->Closed then click on Wall. Surround the floors with walls, and now you have a room! Add some objects into your room using the Object tab, such as tables (/obj/structure/table) and a vending machine (/obj/machinery/vending).
Directional objects
Once you've made your room you'll want to put lights in (/obj/machinery/light). When you click on an object you will have noticed that it appears underneath your mini-map as well. Some objects, such as lights, have to be placed differently depending on where they are placed. Right-click on the light under the mini-map, then click "Generate Instances from Directions". This will bring up all the different directions of the object. If you can't find one for a certain direction (at the time of writing, things like vendors and arcades only face one direction) then it hasn't been sprited yet. Go to #spriter on discord and request it!
Since you now know about directional objects, practice placing a light on each wall facing the correct way. To get these to work, however, they need power.
Power and APCs
Make sure the area layer is enabled. Pick an area from the object tree, for this example we will use /area/clerk, and cover your room in it. Don't worry about the name of it or the look, you will find out how to make new areas later. Each area should have one Area Power Controller (APC) in it. Go to "/obj/machinery/power/APC" and select the first one in the directional menu (area power controller). Place it next to a wall inside the room.
APCs need 4 things edited to them in order for them to look and be functional: name, direction, pixel direction, area link. To edit any object, right-click it and click "Edit..." This will give you a menu showing you all of its changeable variables. It will look very confusing right now due to the amount of things you can change, but don't worry about them at all! Anything that has been changed from the default option will be in BOLD.
Scroll down until you find name and edit the name to be whatever you want.
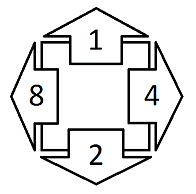
Scroll up to dir. Dir defines the direction the APC is in with regards to the cell it occupies. Basically, 1 means it is above the cell you place it in, 2 is below, 4 is to the right and 8 to the left. You can use the image on the right as a reference image. Edit the dir of your APC so it goes onto the wall.
Note that with APCs, "dir" is the only variable controlling their position. Other objects have their positions defined by "pixel_x" and "pixel_y" - this changes where APCs appear in the editor, but once in-game they snap to whatever the "dir" variable says. Other things, like signs on walls, will only take notice of the pixel variables and not necessarily dir.
Scroll down until you find pixel_x and pixel_y. These are the only two that matter, don't ever change w and z. X determines the position of an object on a horizontal line (right and left) and Y determines the position of an object on a vertical line (up and down). Go ahead and edit your APC so it looks nice on the wall (Right: pixel_x = 24, Left: pixel_x = -24, Up: pixel_y = 24, Down: pixel_y = -24).
In a normal power system, you'd connect the APC up to all the others and the station's generator via SMES cells and cables, but don't worry about that for now. For now you have a basic room that is powered and starts with enough air to breathe happily.
Spawners
To be able to actually spawn into a room, you'll want to place spawners. There are different types of spawners, such as xeno spawn locations and the spawns for all latecomers on the arrival shuttle. Stick in a late-join spawner (/obj/effect/landmark/start/new_player) somewhere inside your room.
Playing on Your Map
To actually play your map and be able to screw around in it, you'll have to compile it. Before doing this, you will need to add your new map to the map list. Don't worry about this for now, instead close Dream Maker, go to the YogStation folder, rename the current YogStation map, then rename your new one to "YogStation". This way all the map settings and .json file are already set up, since it links to the file name. Open Dream Maker back up. Click Build->Compile (from the top menus) and wait for it to finish. This may take a while. This will give you a new file in your Yogstation-TG folder named "yogstation.dmb".
Now to actually boot up a server so you can run your map! Find 'Dream Daemon' (has a big green icon) in your BYOND folder, and click the 'File' dropdown at the top. Locate and select "yogstation.dmb". Select a port if you want, put security on trusted, and visibility to invisible. Click the green "GO" button to start the server, which may take a little while. Once it is ready, the button will turn yellow. Press this to enter the game.
Once in, go to the admin tab and click 'start game'. By joining after the start, you'll spawn at the late spawn you made. To stop your server, go onto Dream Daemon and press the red "STOP" button.
Creating a Map: Advanced
Listed here are some advanced techniques and tips to help you map.
Layered Pipes
There may come a time where you need to connect pressure tanks to pipes that are layered. An example of this can be found in "miningbase.dmm", in the maintenance room. This is very simple to do, just change the piping_layer var on the pressure tank to the same layer number as the connected pipe.
Gas meters also need to have their vars changed in order to work with layered pipes. After placing the gas meter on top of the pipe, change the target_layer var on the meter to the same layer number as the connected pipe.
Areas such as Atmospherics require connecting pipes of one layer to pipes of a different layer. Use a layer adaptor with the pipes either side of it. The layer adaptor is like having a pipe of layers 1, 2 and 3 in one.
Mapping Helpers
These mapping helpers are all placed on top of airlocks for their effect to work.
Abandoned "/obj/effect/mapping_helpers/airlock/abandoned" - Provides the attached airlock with a chance to be; replaced by a wall, bolted, welded or have an open maintenance panel.
Airlock Cyclelink Helper "/obj/effect/mapping_helpers/airlock/cyclelink_helper" - When one door is opened, the other will close. Use on two doors that are facing each other, with the arrow pointing towards the opposite door.
Airlock Cyclelink Helper Target "/obj/effect/mapping_helpers/airlock/cyclelink_helper_target" - When one door is opened, the other will close. Use on two doors that are not facing each other. You will need to edit the "dirx" and "diry" vars. For example if airlock 1 was a single tile above airlock 2, airlock 2 would have a "diry" value of "1" and airlock 1 would have a "diry" value of "-1".
Airlock Lock Helper "/obj/effect/mapping_helpers/airlock/locked" - Used to bolt a door at the start of the round.
Airlock Unrestricted Side Helper "/obj/effect/mapping_helpers/airlock/unres" - Used to remove access restrictions when using the door from one side. The side the arrow faces away from is the side with no restrictions. See the cloning airlock on boxstation as an example.
Randomized Templates
This short guide will teach you to make a template for YogStation.dmm. It will be assuming you are making two cryo rooms for Medbay.
Find the cryo area and figure out how many tiles tall and wide it is (6 down and 7 across). Create two new dmm files in "_maps/yogstation/RandomRuins/StationRuins/BoxStation/" (/Cryo1 and /Cryo2) with the x (7) and y (6) dimensions equaling the size you just measured. Cut (this will copy it too) and Paste the original cryo area onto one of the files. Create your new version on the second file.
Open "yogstation/code/game/objects/effects/landmarks.dm" and add the following:
 /obj/effect/landmark/stationroom/box/cryo
 template_names = list("Cryo Original", "Cryo New")
Follow the previous template in the file if you get stuck.
Open "yogstation/code/datums/ruins/station.dm" and add the following:
 /datum/map_template/ruin/station/box/cryo
 id = "cryo1"
 suffix = "Cryo1.dmm"
 name = "Cryo Original"
 /datum/map_template/ruin/station/box/cryo/newversion
 id = "medbay_cryo_2"
 suffix = "Cryo2.dmm"
 name = "Cryo New"
Compile using ctrl+k. Once it is done go to YogStation.dmm, place /obj/effect/landmark/stationroom/box/cryo into the bottom-left tile of the area you are adding a template to. Cover the entire template area with /area/template_noop and /turf/template_noop. Delete /turf/open/space/basic under the new template_noop areas. Compile again using ctrl+k.
Linking Buttons
Buttons can be linked to a lot of objects, including shutters and doors. It doesn't matter where the button or object is on the map, as long as they are connected correctly they will work.
Shutters: Change the "id" var on the button and the "id" var on the shutters to be the same. Use a keyword that is appropriate, for example the RnD shutters have "id = rnd2".
Doors: Change the "id" var on the button and the "id_tag" var on the doors to be the same. Use a keyword that is appropriate, for example the exterior brig doors have "id = outerbrig".
Shuttles
There are 3 types of shuttle dock:
- Stationary - places where the shuttle can dock
- Transit - shuttle as it moves
- Mobile - the place with the actual shuttle
You will have a transit dock in the transit area, 2 stationary docks (one in centcom, one in the station) and 1 mobile dock in centcom for most shuttles.
The shuttle docks are grouped by id: eg. id = "cargo_away", id = "cargo_transit"
You need to add the dock types to the map and edit the bounding boxes via varediting the dock. You need to varedit height, width, dheight and dwidth at minimum. These are offset by the dir so do keep that in mind, eg if dir = 2 then width goes from EAST to WEST, if dir = 4 then width goes from NORTH to SOUTH and dwidth/dheight are offsets from the lower-left corner of the plane switched to the dock's dir.
You should also ensure the directions face the shuttle or face away from the thing the shuttle docks with.
If a shuttle's mobile docking port direction is different then the stationary docking port's direction, the shuttle and all items on it will be rotated accordingly.
The bounding box for the mobile dock must fit inside of the stationary dock (after any rotation) or the shuttle will refuse to move.
If the shuttle's mobile docking port is in an area that is a subtype of /area/shuttle, only turfs in the bounding box in that same area are moved. Otherwise it moves all turfs in the bounding box. This can be used for odd-shaped shuttles.
The emergency shuttle and cargo shuttle need special subtypes of the dock type, eg /obj/docking_port/mobile/emergency.
The other variables of note is traveldir, which defines if the shuttle rotates on transit and its angle in degrees (imagine the shuttle is inside a circle, if you want the shuttle going right to left set it to 270 degrees).
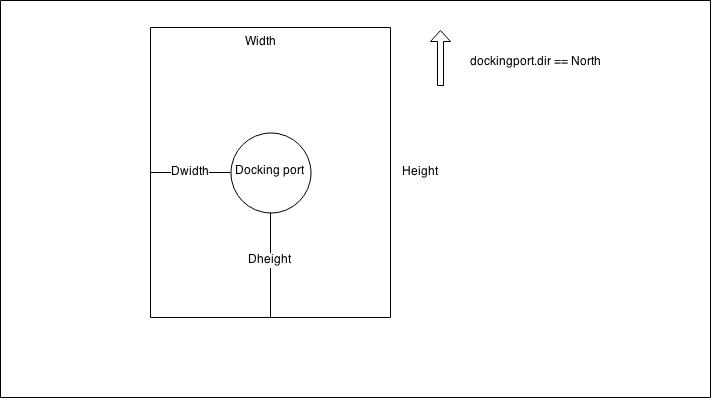
Dwidth and Dheight
dwidth/dheight is the offset of the docking_port obj from the (0,0) bounding box corner. If dir = 1 (north), 0,0 is the bottom left corner. This changes for each direction, for example when dir = 2 it's the upper right corner. So dwidth and dheight identify where the bounding box starts relative to the docking port obj, whereas width and height determine the actual width and height of the bounding box.
We count step 0 as a tile, so a height and width of 9 is actually 10 tiles (tile 0 to tile 9).
Here is an example for the north facing shuttle dock direction - you can rotate this image to determine where the offset is for each other cardinal direction.
Do Not Edit These on the Map
A small list of things to avoid editing on the map, you should instead find the relevant .dm file to do these in.
Paper names and descriptions. Mob names and descriptions. Area names and descriptions. Adding items to all lockers (a small selection of a locker subtype is fine, but not when you need to add an item to every one). Vendor contents.
Pipes and manifolds
Atmospherics releases it's cocktail of gases into the air supply loop (blue pipes). The station is also equipped with a scrubber loop, which filters unwanted gases and sends them back to atmospherics via the scrubber loop (red pipes).
Which pipes are which?
Red pipes are for the scrubber loop, they use the objects in /obj/machinery/atmospherics/pipe/simple/scrubbers/hidden or ../visible (depending on if you want it to show above floors or below them). Have a look at the current maps to get a good idea of when to use each. In general, visible pipes should only be used in rooms such as Atmospherics, where pipes need to be seen. For manifolds use the objects in /obj/machinery/atmospherics/pipe/manifold/scrubbers/hidden and .../visible, and for 4-way manifolds use the objects in /obj/machinery/atmospherics/pipe/manifold4w/scrubbers/hidden and .../visible. You should try to use the layer 3 pipes for the scrubber loop, as that is the standard across maps on this server.
Blue pipes are for the air supply loop, they use the objects in /obj/machinery/atmospherics/pipe/simple/supply/hidden or ../visible (depending on if you want it to show above floors or below them). Have a look at the current maps to get a good idea of when to use each. In general, visible pipes should only be used in rooms such as Atmospherics, where pipes need to be seen. For manifolds use the objects in /obj/machinery/atmospherics/pipe/manifold/supply/hidden and .../visible, and for 4-way manifolds use the objects in /obj/machinery/atmospherics/pipe/manifold4w/supply/hidden and .../visible. You should try to use the layer 1 pipes for the main air supply, as that is the standard across maps on this server.
If you are building a pipe network which has nothing to do with the air supply or scrubbers loop, you can use any other pipe color available in "/obj/machinery/atmospherics/pipe/simple/". The layer should be layer 2, if you are using 1 and 3 for the main pipes.
Scrubbers, Vents and Air Alarms
Scrubbers
Every room on the station, except for maintenance, should have at least one scrubber. They are located at /obj/machinery/atmospherics/components/unary/vent_scrubber/on, and then choose the appropriate layer which should be 3. There should be no problem with the scrubbers, if there is then double-check the scrubber is connected to the scrubber loop (red pipes). If the problem still exists, you've likely changed some vars on it. Make sure the "on" var is at "1", the "scrubbing" var is at "1", the "volume_rate" var is at "200", the "frequency" var is at "1439" and the "id_tag" var is at "null". Failing that, your best bet is to copy across a working scrubber from an existing map.
Vents
Every room on the station, except for maintenance, should have at least one vent. They are located at /obj/machinery/atmospherics/components/unary/vent_pump/on, and then choose the appropriate layer which should be 1. There should be no problem with the vents, if there is then double-check the vent is connected to the air supply loop (blue pipes). If the problem still exists, you've likely changed some vars on it. Make sure the "on" var is at "1", the "pump_direction" var is at "1", the "pressure_checks" var is at "1", the "frequency" var is at "1439" and the "id_tag" var is at "null". Failing that, your best bet is to copy across a working vent from an existing map.
Air Alarms
Every single area that contains scrubbers and/or vent pumps should have exactly one air alarm. More than one should be placed if vent pumps or scrubbers use different frequencies than the default one (1439) or if the room is very large, such as the hallways.
APC
Each new room needs at least one, this will provide all the power for the room. Any room that is very equipment heavy may need another APC to split the load and prevent early black outs. For each APC make sure the "name" var has an appropriate name (such as Clerk Office APC), the "dir" var is the appropriate direction (see the previous image on what it should be), the "pixel_x" and "pixel_y" vars are corrected, and the "areastring" var is the same as the area it is providing power for.
Wiring
Make sure the wires lead from the main power grid to each powered APC. If any equipment in your new area requires a wire under it then line it up, connected to the main power grid, and under the machinery. Wires are also helpful when making electrical grills (just dot wire under a grill), make sure the wires touch the main power grid (or they won't shock people). Wiring on the maps are similar to wiring in-game, so if you play Engineering roles then this shouldn't be a problem.
Disposals
Most, if not all, rooms should have a disposals unit in them. The disposals unit pictured left is an example of what they should look like; "/obj/machinery/disposal/bin" with "/obj/structure/disposalpipe/trunk" underneath it. Then simply connect disposals pipes to it just like you would pipes.
There are two other types of disposal pipes, pictured in the image on the right: junction (top) and sorting (bottom).
Junction pipes serve a purpose like manifolds do to pipes, except they only allow anything coming into the pipe to go out one way. The arrow on the pipe shows the direction anything inside it will go.
Sorting pipes check for destination tags (from Cargo) on objects passing through. If a destination tag is found with the same value as the sortType var on the pipe, then it is moved out of the main disposals line. In the image, objects passing through that are tagged to CMO will be moved out into the straight pipe on the right. SortType values for pipes can be found here.
Access
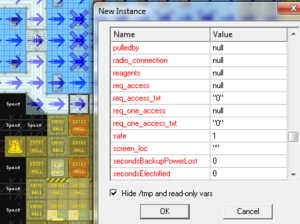
Access to doors is handled by req_access values. There are four when editing a door - req_access, req_access_txt, req_one_access, and req_one_access_txt. The ones we're concerned with are req_access_txt and req_one_access_txt.
This image shows a door on the Arrivals shuttle - since it's a public door, the access is set to "0", as everyone should be able to open it. If we look at the Brig front door, we would set the "req_access_txt" access to 63, because that's the value for Security front doors - accessible by Security positions, but no one else.
Multiple accesses to doors are handled by adding a semicolon (with no spaces) between access values, using the "req_one_access_txt" var (eg. "28;31" is for Kitchen and Cargo access). This is useful for small maps, such as Omegastation, where jobs need to share access due to cramped spaces.
There's an important difference between the two that you need to pay attention to - req_access_txt requires all listed accesses to open the door, while req_one_access_txt lets anyone with one of the listed accesses open the door. For example - say you want your Brig to be accessible by the Detective and Security Officers, we would put "63;4" in req_one_access_txt, because we want the Detective and Security to have access. If we used req_access_txt, you would need both accesses to open the door, meaning neither the Detective or Security could open it.
You can view all of the access values in the access.dm file here. If you get confused, you can take a look at Boxstation's map file and check the value on the door you're looking for.
Airless Floors
Ideal for rooms or chambers that mix gas. Tiles exposed to space should always be airless. These should not be used for tiles that humans will cross in frequency, such as tiles on the station. Double check to make sure you don't suffocate mobs with the tiles.
Mapping Checklist
This is a general checklist to consult, certain conditions may change the need for these.
☑ Each area has one air alarm.
☑ Each area is connected to the scrubbers and air loop.
☑ There are no stacked or misplaced disposals pipes, air pipes or wires.
☑ Each room has at least one vent and scrubber, connected to the appropriate pipes.
☑ The air supply pipes are blue and on layer 1. The scrubber loop pipes are red and on layer 3.
☑ Each area, including maintenance, has at least one APC.
☑ Wiring is all connected and windows are electrified that need to be.
☑ Every department that needs one has a supply request console on the wall and in a place that is easy to see and use.
☑ Every area that needs it has lights. There are just enough to light the room and not enough to drain the APCs quickly.
☑ Areas with lights have a light switch on the wall by the door.
☑ Every room has an intercom set to 145.9, speaker ON, Microphone OFF.
☑ Every room has just enough security cameras for the AI to see. Each camera has the appropriate name under the ctag var.
☑ Floors are airless when they should be, and only where they should be.
☑ Each area has a fire alarm and fire doors.
☑ Access is correct (doors, windoors, buttons, etc).
☑ All items are placed correctly, not under items they shouldn't be.
☑ Areas are balanced correctly (eg. the Vault should be made of reinforced structures and electrified windows, the Kitchen should not).
☑ Areas are not too empty.
☑ Disposals is connected and works.
☑ All station rooms have gravity.
Checking tools:
These are in-game tools that will provide you with a list of mapping errors:
- Admin tab, Get Current Logs, map_errors.log. This will provide you with a list of errors, such as APCs placed wrong or duplicated pipes.
- Debug tab, Debug verbs - enable, Mapping tab, Camera Report/Check Plumbing/Check Power/Test Areas. These will provide you with different checks.
If all your checks pass, then map merge and PR your change.
Before Making Your PR
Final Requirements
This requirement assumes you have made a completely new map. If not, then ignore it and move on to map merger.
Make sure your map is in its own folder inside "_maps/map_files". Follow the naming structure of the other maps and folders.
In "_maps/_basemap.dm" you will need to insert a new line, "#include "yogstation\map_files\YogsPubby\YogsPubby.dmm". Replace YogsPubby with your folder name and file name.
In "_maps", make a new .json file. I copied an existing one and used an online editor to view the file. This file should contain the following:
 {
   "map_name": "YogsPubby",
   "map_path": "map_files/Yogspubby",
   "map_file": "Yogspubby.dmm",
   "shuttles": {
     "emergency": "emergency_pubby",
     "whiteship": "whiteship_pubby",
     "ferry": "ferry_fancy",
     "cargo": "cargo_box"
     }
 }
Replace yogspubby with the appropriate names for your map, and change the shuttles if needed.
In "_maps", make a new .dm file containing the line, "#define FORCE_MAP "_maps/yogspubby.json". Replace yogspubby with your .json file name.
In "config/maps.txt", make a new line containing:
 map yogspubby
 endmap
Map Merger
It is important that you use the Map Merger tools before committing any changes to a map. See here for how.
Step X and Y
If you compiled the map and suddenly whenever you move you no longer get the animation of moving but just 'appear' on the next tile, this problem has occurred. Step_x and step_y were introduced to allow pixel based movement. SS13 does not utilize this. Step_x and step_y are variables that each atom has. The way they work is that as soon as you set any object on the map to use one of these variables, the game interprets that you overrode all default movement code and wrote your own - but you didn't. Luckily it's a really easy fix.
To fix this problem you need to close dream maker (save the project first, obviously). Open your map (.dmm) file in a text editor, such as notepad or notepad++. Search (ctrl+f) through the file for step_x and step_y and remove any reference to it. Once no more instances of step_x or step_y are found in the file, save it and open it in dream maker once again. Compile the code and movement should work fine once more. Ask on our discord if you need any extra help.
Contribution guides
| |
| General | Hosting a server, Setting up git, Guide to GitKraken, Downloading the source code, Guide to contributing to the game, Reporting issues, Game resources category, Guide to changelogs |
| Database (MySQL) | Setting up the database, MySQL |
| Coding | Understanding SS13 code, SS13 for experienced programmers, Text Formatting |
| Mapping | Guide to mapping, Room Structure, Map merger |
| Spriting | Guide to spriting |
| Wiki | Guide to contributing to the wiki, Wikicode, Styleguide |
