|
|
| (5 intermediate revisions by the same user not shown) |
| Line 1: |
Line 1: |
| {| style="float:top; background-color:#FF0000;font-size:95%; vertical-align:middle;" width="100%" border="2" cellspacing="0" cellpadding="0" background-color:#900; ;
| | Mood is off by default on Yogstation. '''To turn it on, go to your game preferences.''' Certain [[quirks]] are locked behind mood. |
| !'''Disclaimer:''' '''THIS IS A JOKE. THIS CAN GET YOU BANNED ON YOGSTATION (MIGHT BE ALLOWED AT OTHER STATIONS WITH NO RP).'''
| | ==Mood & Sanity== |
| |}
| | '''Mood''' reflects how happy your character is in Space Station 13, and changes dynamically based on things that happen to or around you that would realistically impact it. Mood has significant effects on gameplay; as bad mood will decrease, and good mood will increase your sanity. |
|
| |
|
| {{JobPageHeader
| | '''Sanity''' has various effects depending on its state. Good sanity has effects such as making you hungry less fast, and allowing you to perform certain actions faster. However, if your sanity is low, you might have trouble focusing, perform actions more slowly, and even walk at a shuffle. |
| |headerbgcolor = #af6366
| |
| |headerfontcolor = white
| |
| |stafftype = NOT ALLOWED JOBS
| |
| |imagebgcolor = #e3c9ca
| |
| |img_generic = Generic_security.png
| |
| |img = SecurityOfficer.png
| |
| |jobtitle = Shitcurity.
| |
| |access = [[Security Office|Security]], [[Brig]], [[Prison_Wing|Holding Cells]], [[Courtroom]], Weapon Permit
| |
| |additional = [[Maintenance]], [[Morgue]], [[Detective's Office]]
| |
| |difficulty = Very Hard, be robuster than the horde of criminals!
| |
| |superior = You are over the law, everyone who resists shall get its punishment!
| |
| |duties = Follow the [[Standard Operating Procedure]] just kidding, who needs that shit!
| |
| |guides = [[Guide to security]], [[Robust]]
| |
| |quote =Who said I need to follow the space law? I am over the law. If I will see you, you will be executed for shitting. All those [[Greytider|Greytiders]] shall rot in permabrig forever!
| |
| }}
| |
|
| |
|
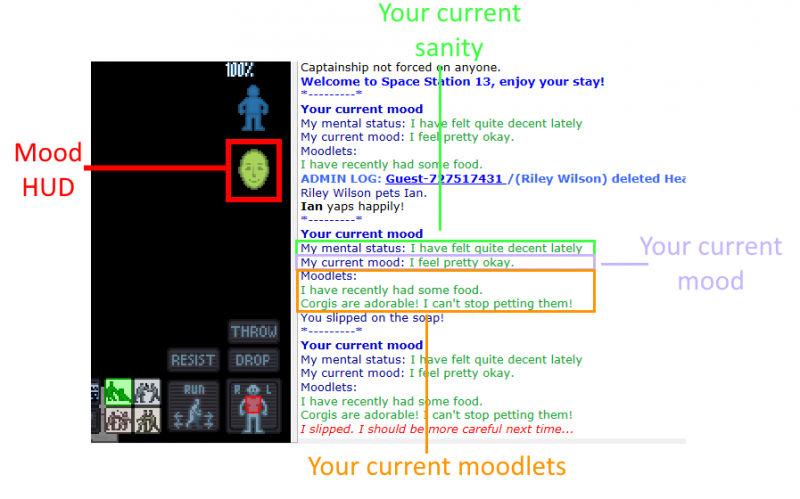
| | You can see the current status of your character by clicking on the HUD icon on your screen which resembles a face. |
|
| |
|
| Welcome to Security. Chances are that you have been assigned this job because it was the only available position other than [[Assistant]]. Since you'd rather not end up a corpse, or doubt the prospects of reassignment, you've chosen the Few, the Red, and the Despised. The shitcurity.
| | [[File:MoodExplained.png]] |
| | ==Moodlets== |
| | A mood event is called a ''moodlet''. In simple terms, your overall mood is directly related to the moodlets you have. Each moodlet has a modifier and sometimes a time; modifiers are the amount of mood that the event will add or remove, and it will do these for as long as its time has not expired, or the event hasn't ended. For instance, if a moodlet has a modifier of +1 for 3 minutes, you will have that slight boost to your mood for three minutes, but once this time has ended, you will not, or if you enter an ugly room, you will gain a bad moodlet until you leave the room. |
|
| |
|
| '''Important: If you got no experience to Space Station 13, other than your awesome combat skills. DO play Security! You will become the law and everyone will have a bad time, because they said shit about you.'''
| | Many actions and factors play into different moodlets, from something as simple as petting a corgi to something more complex like how filthy your surroundings are. As a rule of thumb, taking care of yourself and treating your body well will make you happier, while neglecting needs such as hunger and getting very hurt will make you sad. |
|
| |
|
| '''Bare minimum requirements:''' Be as robust as a human being possibly can.
| | Some traits also modify moods in some way. Jolly and Depressed will make you randomly happier or sadder with no prompting, and Apathetic will reduce all mood impacts by 20%. |
| | | ==Mood Thresholds== |
| ==The Peacekeeper==
| | There are nine different mood thresholds that allow you to see your general morale state as an icon on your HUD: |
| [[File:Thebrig.png|300px|thumb|alt=Brig|The [[Brig]], your homebase]]
| | {| class="wikitable" border="3" cellspacing="0" cellpadding="5" |
| You are the sole guardian between the ideals of justice and the wild psychotics that your company has chosen to advance its interests in space. Just because everyone else is insane, it doesn't mean, you are not. You are permitted to go hog-wild and beat them all unconscious to strap them to beds. Professionals have standards.
| | ! style="background-color:#DDDDDD;" width="32px" |Icon |
| | | ! style="background-color:#DDDDDD;" width="80px" |Name |
| ==Equipment== | | ! style="background-color:#DDDDDD;" width="140px" |Threshold |
| | | ! style="background-color:#DDDDDD;" width="100px" |Sanity Change / tick |
| *Learn your surroundings.
| | |- style="text-align: center;" |
| **If you see any incompetent [[Security Officer]], beat him up and teach him the ways of Shitcurity.
| | ![[File:MoodDepressed.png]] |
| *Equip yourself fully armed.
| | |Depressed |
| **Get as many harm batons as humanly possible incase some [[Greytider]] or [[Clown]] decides to steal your property.
| | |<=-20 |
| **Ask the [[Warden]] or the [[AI]] to open the armory. If questioned say you need a disabler, then take a big gun for your dreams.
| | | -0.4 |
| *Go patrol hallways and beat the shit out of every wrong move people make.
| | |- style="text-align: center;" |
| | | ![[File:MoodVerySad.png]] |
| ==Know Your Place== | | |Very Sad |
| Well, this page is designed to turn you from angry, bitter waste of supplies into a useful and productive member of the station community. A few things to immediately note:
| | | -20 to -15 |
| | | | -0.25 |
| *This ship is not a democracy. Its totalism, since you are here. You are above everyone else. Even those [[Chain of Command|pesky members]] shall not ruin your job. Train [[Greytider|Everyone]] you can, they will become your helpers, who will assist you in commanding the place
| | |- style="text-align: center;" |
| *The [[Warden]] has authority over the [[Brig]] and [[Prison Wing]]. But you can kill him, take full access to the armory and dispose his body. Then say how you saw [[Clown|that one man]] cremate the body of warden.
| | ![[File:MoodSad.png]] |
| *Central Command might not like the totalism of the station, so they will send a squad to remove the command and set new "competent" staff. However you are ready. You shall arm people and tell them Centcomm decided to raid us.
| | |Sad |
| *You are effectively the police. The corporations have agreed upon a set of laws that they are all beholden to. But who the fuck needs that. Your word - Your saying. You are the law. Tell everyone to obey the Dictator and watch everyone with utter suspicion.
| | | -15 to -10 |
| *If the station is doomed, and you see people mutining, be ready to arm yourself with the most prestige guns. If the situation is out of control and you cant win, take the nuke disk in your hand, and nuke the station.
| | | -0.15 |
| | | |- style="text-align: center;" |
| ==[[Security Office]]==
| | ![[File:MoodMeh.png]] |
| [[File:SecHq.png|thumb|300px|The [[Security Office]] above [[Brig]]]] | | |Down |
| The first step after you arrive is to find unused security [[lockers]] either in the brig's equipment room or at the arrivals security checkpoint, open all of the lockers and take out the harmbatons. If it has all been claimed, raid the [[Armory]] for additional resources.
| | | -10 to -3 |
| | | | -0.05 |
| ===Security Equipment===
| | |- style="text-align: center;" |
| '''[[Security_Items|See here what items you're about to use and how to use them.]]'''
| | ![[File:MoodNeutral.png]] |
| | | |Neutral |
| '''[[Guide_to_security#Security_Equipment|See here how to equip yourself so you'll be ready for everything the station may throw at you.]]'''
| | | -3 to 2 |
| | | |0.1 |
| ====[[File:Recharger.gif]] Remember to Recharge!====
| | |- style="text-align: center;" |
| Always have your tools recharged after an arrest. If your [[flashes|flash]] is burnt out, get a new one from the lockers or security vending machine and hand your old one to a [[roboticist]]. Then take your baton or taser, pop them in the charger station in your security office or the [[Head of Personnel]]'s desk, and wait for the light to change from green to yellow. Having a charged stun baton is sometimes the difference between life and death.
| | ![[File:MoodHappy.png]] |
| | | |Content |
| ==[[File:Donut.png]] Donuts==
| | |2 to 6 |
| Any good Security Officer always has some of these around at all times. They are delightful little munchables that can be obtained in a few ways. You can find an immediate supply in the donut boxes around the station, and you can get more from the SecTech in the equipment room. If there is a severe shortage of donuts, you can always get the [[Chef]] to make you more. There are four types of donuts.
| | |0.15 |
| | | |- style="text-align: center;" |
| [[File:Donut1.gif]] '''Plain Donut:''' Heals you, gives some nutrition. | | ![[File:MoodPleased.png]] |
| | | |Happy |
| [[File:Sprinkles.gif]] '''Frosted Donut:''' Like the plain donut, but heals more health. | | |6 to 10 |
| | | |0.2 |
| [[File:Jdonut1.gif]] '''Jelly Donut:''' Holy Jesus! What is that? What the fuck is that? WHAT IS THAT, PRIVATE PYLE? Only obtainable through the Chef. Heals more than the Frosted Donut, gives more nutrition. | | |- style="text-align: center;" |
| | | ![[File:MoodVeryHappy.png]] |
| [[File:Donut1.gif]] '''Chaos Donut:''' Only obtainable through the Chef. Kills you, due to a great deal of entropy caused by eating it. | | |Very Happy |
| | | |10 to 15 |
| ==When Things Go Tits-Up== | | |0.25 |
| You are most essential when chaos has broken out. When Joe Schmoe has decided to take the law into his own hands, it's usually with murderous and arbitrary intent. This cannot be allowed. If you are doing your job, it should never come to pass.
| | |- style="text-align: center;" |
| | | ![[File:MoodEcstatic.png]] |
| ===[[Game Modes#Revolution|Revolution: Red Uniforms Does Not Mean Communism]]=== | | |Ecstatic |
| Sometimes [[traitor|syndicate forces]] will encourage the station crew to rebel against the Heads of Staff. This will not be a simple protest. It will be a riot culminating in multiple murders and a mutiny. Needless to say, you will be a target if you move to prevent this -- and you must move to prevent this.
| | |>=15 |
| | | |0.4 |
| When there has been proof established that a person has been brainwashed, detain them as normal and ask the Heads what you should do. Usually they'll want you to attempt to deprogram them. Request a loyalty implant from the Warden or Head of Security and they should visibly change their attitude when remembering their true allegiance. Barring that, apply your deactivated stun baton repeatedly to their forehead in a forceful manner. If death should occur without change, bring the body to the [[roboticist]]s.
| | |- |
| | | |} |
| ===[[Game_Modes#Nuclear|Nuclear Operatives: Invaders, Possibly From Space]]===
| | ==Sanity Thresholds== |
| There may be days when syndicate forces invade the station directly with the intent to use a nuclear device to destroy it entirely. Anyone who isn't crew is to be violently and sufficiently repelled. Detain them when able, confiscate everything, and eliminate when all other options are exhausted. Communication is most important right now. Ensure that the captain, or whoever bears the disk, is guarded at all times. If things go completely out of control, do what you must to get the shuttle called and the disk onto it. Trust no one if you can't see their face. It is not unreasonable to ask them to remove any masks and stun them to remove it yourself if they refuse.
| | Similar to mood, Sanity has 6 thresholds which can be reached. |
| | | {| class="wikitable" border="3" cellspacing="0" cellpadding="5" |
| ===[[Game_Modes#Wizard|Wizard: Of Bed-knobs And Broomsticks]]===
| | ! style="background-color:#DDDDDD;" width="40x" |Name |
| When the [[Backstory#Space_Wizard_Federation|Wizard Federation]] has sent a representative, it is not in peace. You are facing no mere mortal. A [[wizard]] is a highly trained killing machine of unknown potential. Your stun baton will be useless. [[Tazer|Find]] [[energy gun|a]] [[laser gun|gun]]. You must keep your wits about you and your bravery steadfast! Stun the wizard, beat him unconscious, remove the clothing that gives him power, and don't stop hitting until his [[brain]] has exited his skull. The only good wizard is a dead wizard.
| | ! style="background-color:#DDDDDD;" width="80px" |Threshold |
| | ! style="background-color:#DDDDDD;" width="140px" |Description Ingame |
| | |- style="text-align: center;" |
| | |Insane |
| | |<25 |
| | |AHAHAHAHAHAHAHAHAHAH!! |
| | |- style="text-align: center;" |
| | |Crazy |
| | |25 to 50 |
| | |I'm freaking out!! |
| | |- style="text-align: center;" |
| | |Unstable |
| | |50 to 75 |
| | |I'm feeling a little bit unhinged... |
| | |- style="text-align: center;" |
| | |Disturbed |
| | |75 to 100 |
| | |I have felt quite decent lately. |
| | |- style="text-align: center;" |
| | |Neutral |
| | |100 to 125 |
| | |I have been feeling great lately! |
| | |- style="text-align: center;" |
| | |Great |
| | |125< |
| | |My mind feels like a temple! |
| | |- |
| | |} |
| | ==Sanity Effects== |
| | Sanity has notable effects on your character: |
|
| |
|
| ===[[Game_Modes#Gang War|Gangs: Gee, Officer Krupke]]===
| | *Very sad characters will move more slowly. |
| When gangs take root on the station, you're in for a violent day. Most gangsters will be more occupied with growing their ranks, defending their turf and fighting enemy gangsters than with Security; however, it is still your duty to protect the station, keep the peace, and make sure they don't take over the station. Keep an eye out for suspicious behavior. Loyalty implants can deconvert gangsters and will identify gang bosses, but they can be removed or overridden. Trust no one. If a gang manages to put down a Dominator, destroy it.
| | *The screen will become progressively more blurred as you become more sad, to represent inability to focus. |
| | *Action speeds vary with mood, up to a maximum of -25% speed for the severely depressed and +10% speed for the very happy. |
| | *Hunger rate is proportional to mood. Depression will spurn you to eat more, while contentedness will make you eat less |
|
| |
|
| ===[[Game_Modes#Cult|Cult: Eldritch Criminal Scum]]===
| | <br /> |
| Cultists of Nar-Sie, unless apprehended, can quickly overcome even the most prepared and robust Security crew. The [[Chaplain]] will be your best friend. Find him (assuming the cultists haven't gotten to him already), protect him, and work with him to produce holy water, which deconverts cultists after a short period of time. Otherwise, standard procedure about searches and loyalty implants applies. For more tips, read the [[Cult_magic#Fighting_the_Cult|cult guide]].
| |
|
| |
|
| ==Tips== | | == Obsession (a.k.a. depend on mood) == |
| | Some Antagonist roles are dependant on mood and its moodlets, without them you wont be able to do your tasks/objectives. One of the major Antagonist who depends on mood is Obsessed. |
|
| |
|
| *Hold handcuffs and click on a pair of orange shoes (standard prisoner issue). Result: Leg cuffs!
| | Obsessed role is given via a random event and enables the mood automatically. The mood of Obsessed can change via following factors: |
| *The riot gear gives you excellent protection against melee attacks at the cost of defense from bullets and lasers. The ablative armor is the same, except for lasers. The bulletproof armor is the same as the other two, but protects against bullets.
| |
| *If you're wearing sunglasses/secHUD + a helmet/Warden's hat/HoS's hat OR a pair of earmuffs, flashbangs will only stun you for 5 seconds, otherwise you'll be down helpless for a full 20 seconds. This gives security 15 seconds (the same as a taser/stun baton) to slap the bracelets on the perp that’s too slippy to hit normally.
| |
| *If you're wearing sechud glasses and examine someone, you can change their wanted status by clicking on it in the description. If you're really cool you can even add why they're wanted by clicking the add crime link.
| |
| *You can move rechargers by wrenching them and dragging them behind you and wrenching them back down to work again.
| |
| *Loyalty implants prevent someone from being converted to a revolutionary and deconvert existing revolutionaries. They also prevent someone from being brought into a cult but do not decult those tainted by the Dark Lord's power.
| |
| *If you are cloned you lose your loyalty implant.
| |
| *As a Security Officer, when you see someone set to arrest, friendly ask them to follow you to the brig first. You'd be surprised how often people cooperate even when they are criminals, and it saves you the hassle of SHITCURITY and HELP ME. You can always stun them if they refuse.
| |
| *You can retrieve the MMI from a beaten-to-death cyborg by welderbombing it, if you want it to fess up to who the potato is that subverted him and you don't have access to the robotics console.
| |
| *Armor is a lifesaver, even the base officer armor.
| |
| *Examining shell casing tells you what kind of ammo it is. .38? Detective. .357? Traitor. 12mm? Nuke ops. ADDED: .357 and 12mm could also point to a wizard round. .38 for that matter, too.
| |
| *Once you have a combat mech, the only two things that can stop you is high level antags (wiz / nuke ops / ninja), toxins, and Ion Rifles (R&D can make them and there is one in the Armory). Deal with all of these, and you’re a god among men. And yes, a hulk is shit against a Gygax spamming ac 2 SMG fire as well as KO punching him at close range. And no, xenos are shit against a Gygax due to the KO punch then ac 2 SMG fire.
| |
| *Gygax, set to harm intent: KO punch. And Gygax can overload in order to go at SANIC SPEED, so it can retreat at the cost of some damage.
| |
| *Riot shields have a good chance block melee attacks, even hugs.
| |
| *In addition, Riot Shields completely protect against Alien jump attacks and can block their disarms. If your fighting Aliens bring a Riot Shield.
| |
| *EMP'ed stun batons only lose 10% charge, can be a life saver (not that you get EMP'ed often).
| |
| *While using the security cameras console you can take a regular camera in your hand and take a picture of the image you are viewing through the console. You can finally get a picture of a suspect for your wanted papers.
| |
| *Mesons can detect bombs.
| |
| *Soap will keep you down for about 3-4 seconds. Peels for about 8 seconds. Water slips for about 10 seconds . Detective’s revolver for ~10 seconds. Egun stun is about 10 Seconds. It takes about 4 seconds to cuff someone.
| |
| *Unrobust? Security? Call Officer Beepsky to you, disable his patrol mode, then drag him around everywhere. Shift+click anyone who fucks with you and set them to arrest and Beepsky will ensure you never get robusted again.
| |
| *Security Camera consoles can track borgs.
| |
| *You can set Officer Beepsky to arrest people (except heads and security staff) who are holding weapons.
| |
| *You can chain-open things by dragging containers in containers to your sprite. Can't actually take/put things, but it's slightly faster for checking suspect boxes.
| |
| *Filling half of the pepper spray with wielding fuel and having a zippo in pocket is pretty flamy thing, it gives a lot of fun to aliens if they are horribly unrobust.
| |
| *PRO SECURITY SEARCH TIP: Always check the Janitor's trash bag and the Chaplain’s bible. Don't forget that boots can hide contraband as well.
| |
| *Disablers deal 34 holodamage, take three hits to do anything more than slowdown, and can be reflected. However, they paralyze hulks, so they can safely be dehulked, they knock out wizards, so they can't cast anything, and if someone has been knocked out by it, they are down for however long it takes for them to sleep off the holodamage, no shaking them back up. ADDED: Disablers are nice to have as a sidearm, or if you want to pass out guns. They get twenty shots.
| |
|
| |
|
| | Negative: |
|
| |
|
| {{Jobs}}
| | * The person who is the character is obsessed with, isn't near him. -> Mood Rate (insert +/-) |
| [[Category: Jobs]]
| | * The |
Mood is off by default on Yogstation. To turn it on, go to your game preferences. Certain quirks are locked behind mood.
Mood & Sanity
Mood reflects how happy your character is in Space Station 13, and changes dynamically based on things that happen to or around you that would realistically impact it. Mood has significant effects on gameplay; as bad mood will decrease, and good mood will increase your sanity.
Sanity has various effects depending on its state. Good sanity has effects such as making you hungry less fast, and allowing you to perform certain actions faster. However, if your sanity is low, you might have trouble focusing, perform actions more slowly, and even walk at a shuffle.
You can see the current status of your character by clicking on the HUD icon on your screen which resembles a face.
Moodlets
A mood event is called a moodlet. In simple terms, your overall mood is directly related to the moodlets you have. Each moodlet has a modifier and sometimes a time; modifiers are the amount of mood that the event will add or remove, and it will do these for as long as its time has not expired, or the event hasn't ended. For instance, if a moodlet has a modifier of +1 for 3 minutes, you will have that slight boost to your mood for three minutes, but once this time has ended, you will not, or if you enter an ugly room, you will gain a bad moodlet until you leave the room.
Many actions and factors play into different moodlets, from something as simple as petting a corgi to something more complex like how filthy your surroundings are. As a rule of thumb, taking care of yourself and treating your body well will make you happier, while neglecting needs such as hunger and getting very hurt will make you sad.
Some traits also modify moods in some way. Jolly and Depressed will make you randomly happier or sadder with no prompting, and Apathetic will reduce all mood impacts by 20%.
Mood Thresholds
There are nine different mood thresholds that allow you to see your general morale state as an icon on your HUD:
| Icon
|
Name
|
Threshold
|
Sanity Change / tick
|

|
Depressed
|
<=-20
|
-0.4
|

|
Very Sad
|
-20 to -15
|
-0.25
|

|
Sad
|
-15 to -10
|
-0.15
|

|
Down
|
-10 to -3
|
-0.05
|

|
Neutral
|
-3 to 2
|
0.1
|

|
Content
|
2 to 6
|
0.15
|

|
Happy
|
6 to 10
|
0.2
|

|
Very Happy
|
10 to 15
|
0.25
|

|
Ecstatic
|
>=15
|
0.4
|
Sanity Thresholds
Similar to mood, Sanity has 6 thresholds which can be reached.
| Name
|
Threshold
|
Description Ingame
|
| Insane
|
<25
|
AHAHAHAHAHAHAHAHAHAH!!
|
| Crazy
|
25 to 50
|
I'm freaking out!!
|
| Unstable
|
50 to 75
|
I'm feeling a little bit unhinged...
|
| Disturbed
|
75 to 100
|
I have felt quite decent lately.
|
| Neutral
|
100 to 125
|
I have been feeling great lately!
|
| Great
|
125<
|
My mind feels like a temple!
|
Sanity Effects
Sanity has notable effects on your character:
- Very sad characters will move more slowly.
- The screen will become progressively more blurred as you become more sad, to represent inability to focus.
- Action speeds vary with mood, up to a maximum of -25% speed for the severely depressed and +10% speed for the very happy.
- Hunger rate is proportional to mood. Depression will spurn you to eat more, while contentedness will make you eat less
Obsession (a.k.a. depend on mood)
Some Antagonist roles are dependant on mood and its moodlets, without them you wont be able to do your tasks/objectives. One of the major Antagonist who depends on mood is Obsessed.
Obsessed role is given via a random event and enables the mood automatically. The mood of Obsessed can change via following factors:
Negative:
- The person who is the character is obsessed with, isn't near him. -> Mood Rate (insert +/-)
- The
