Guide to the Antimatter Engine

|
This page needs revising!
The following page is out of date and/or needs to be revised. If the page's guide needs revision, see here for an example. |
Are you tired of setting up the same old singularity, tesla, or supermatter? Can't figure out the TEG because there isn't a proper guide for it? Your attempt at a fusion reactor accidentally turn the station into a baby star?
Well, why not try the good old antimatter reactor? Now available from your local cargo department for the low, low price of 9k credits! Plus shipping and handling.
The antimatter was ported from /vg/station on October 10, 2016, which is why their sprites look somewhat out of place.
Before You Begin
You will need the following tools:
The actual components of the reactor can be purchased by Cargo.
 An antimatter shielding crate, containing 10 antimatter shields
  and costing 2,000 credits.
 An antimatter control crate, containing 1 antimatter control unit
  costing 5,000 credits.
 An antimatter jar crate, containing 2 antimatter containment jars
  and costing 2,000 credits.
How to Set Up the Antimatter Reactor
Find a suitable area and then open all 3 crates.
Clear out an area and put a wire connected to the powernet:
Then, drop 9 of the packaged antimatter reactor sections in a 3x3 square to the right of the control unit.
After that, drag that controller down and wrench it. Make sure it looks like this:
Unless you intend to get more reactor sections, this will also define the size of your reactor.
Now, grab your multitool and click on the boxes in any order, as long as you make sure you get the center before you enclose it.
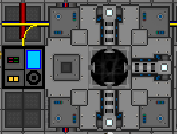
Once you have done that, your engine should look, well, like an engine, as in the picture below:
Now, grab an antimatter jar from the antimatter jar crate and put it in the antimatter control unit.
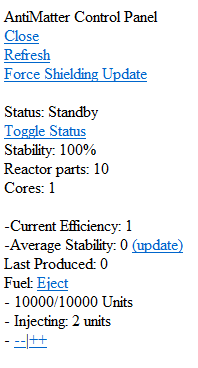
Left click on the control unit and you should see a screen like this:
Click toggle status, and it's done!
By default, it should be generating around 800 kilowatts with just 2 units of antimatter being injected.
Enjoy your new engine, and don't forget to hook it into the SMESes or you will be probably killed by the crew.
To create more power after the fuel has run out, eject the fuel jar, place a new fuel jar inside, and set the mode to Injecting once more.
Remember, always set the injection rate to no more than two times the number of cores. By default (the base 3x3 engine), this is 2. Higher injection rates will produce additional power, but also damage the integrity of the control unit. If integrity zero, it will cause a large explosion.
Expansion
- The antimatter reactor injects the specified amount every 6 to 8 seconds.
 Antimatter containment jars contain 10,000 units of antimatter each. Divide that by the number of units being injected to see how long one will last.
Adding segments to the Antimatter Engine will increase the number of cores, in turn allowing you to safely increase injection rate. Remember that this will also cause the engine to deplete fuel faster.
The power produced by an antimatter engine as it is expanded has linear growth, and is given by the formula: (Injection Rate)^2 * 20000 / (Number of Cores).

